When you need big-time moviemaking power in an easy-to-use app, it's time for Pinnacle Studio 16 Ultimate. With Pinnacle Studio 16, you can quickly edit video, audio and photos with stunning results.
The first step is to import and arrange your clips in the Storyboard, then you can make frame-accurate edits using the Timeline, and add high-quality transitions, effects, and a soundtrack. Enjoy full 1080p HD output support, including Blu-ray™ authoring and stereoscopic 3D, and share your movie directly to YouTube, Facebook, Box and more.
While even novices can get started quickly with Pinnacle Studio, as we'll outline below in our Getting Started tutorial, power users will revel in Pinnacle Studio's amazing array of more than 2000 special effects, 2D/3D transitions and templates, as well as a green screen for superimposing people on different backgrounds. Pinnacle Studio 16 Ultimate also includes the Red Giant Filmmaker's Toolkit and Motion Graphics Toolkit.
Getting Started
After installing the software, you'll see extensive help options, including a full PDF manual, in-app help, and a training series. There are also dozens of great video tutorials available on the Pinnacle Studio YouTube channel. This Getting Started guide is designed to help you get your feet wet, but we encourage you to explore some of the other resources to experience the full power of Pinnacle Studio.
Add Media to the Library
Upon opening Pinnacle Studio, the first thing to notice is the tab bar at the top of the screen, with the main options like "Import," "Library," "Movie," "Disc" and "Export." To get started, click on the Import tab to bring in any video, photos and audio tracks you want to use in your new movie that are not already in your Pinnacle Studio Library, such as new clips from your camcorder or audio tracks from a CD. (Media files already on your hard drive can automatically be added to your Library when you install Pinnacle Studio.)
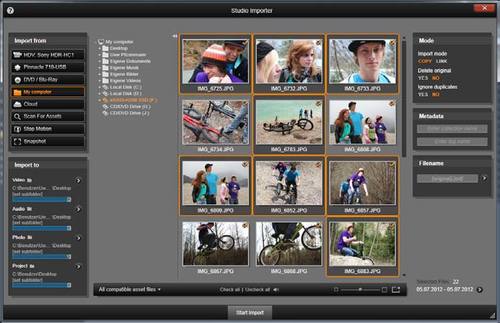
The Pinnacle Studio Importer helps you bring in all your source material (click to enlarge).
On the far left, you'll see a list of attached devices (cameras, camcorders, USB sticks, SD cards, CDs/DVDs, hard drives and other locations, including linked Cloud services like Box). Click the device you want to import from, and a location (folder on your hard drive) to save to (middle left), then select the files you want to import. If needed, you can play video clips and audio files to preview them before selecting. Finally, click the Start Import button at the bottom.
Select Media for Your Production
Now that you've imported all your media files, click the Library tab at the top to select the material for your project. The simplest way is to make a new Collection (at left), and give it a name. Then drag all your project files into this Collection. Choose the relevant section of the library: videos, photos, or audio, and then scroll or use the search box to find the items you want to use. You can preview any clip, and pre-trim it in the preview window before adding it to the storyboard. To pre-trim, just move the start and end markers to the desired locations, then drag the clip straight from the preview window to the storyboard. For photos, double-click to crop, straighten or color-correct. Here are video tutorials on importing media from hard drive or file, and from tape or disc, and another on using the Library.
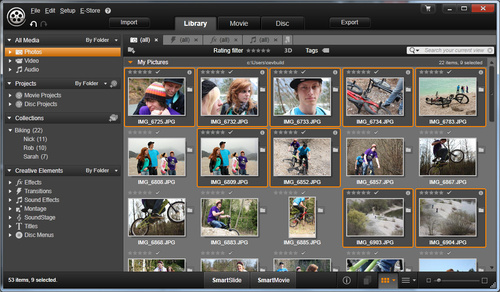
The Pinnacle Studio Library, where you can organize, rate and edit all your source media (click to enlarge).
Make Your Movie
Now that you've got your photos, audio and video selection, and trimmed or cropped as needed, it's time to start creating your movie! Click on the Movie tab, where you'll see your media at top left, a preview window at top right, and the Storyboard and Timeline at the bottom. The Storyboard lets you quickly arrange and reorder clips by dragging. In the Timeline below, you'll see: an Overlay track for video and title graphics (Picture-in-Picture, Chroma key or other effects); a Video/Audio track for video with synchronized audio, photos or any other objects; a Music track for Sound effects or music; a Sound track for Sound effects or music; and a Voice Over track for voice-over narration (this will be automatically created with first recording).
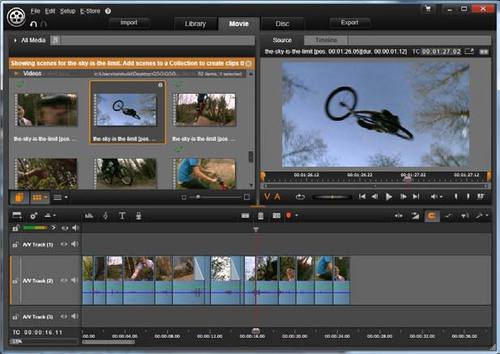
The Pinnacle Studio Movie Window, where you create your production (click to enlarge).
Find the Collection you put together earlier at top left, and start dragging media to appropriate places on the Storyboard or Timeline. Pinnacle Studio will show you what will happen even before you drop the clip. So have fun and experiment! You can always use the Undo button (reverse arrow in the toolbar along the top of the Timeline) There are lots more ways to add/edit media using the Preview window and Timeline, but we don't have space to go into them here. Check out this great tutorial on basic editing for more!
Add Transitions and Effects
Now that you've dragged in your media to the appropriate positions on the Timeline, it's time to get fancy with some special effects and transitions! This is where Pinnacle Studio truly excels. Again, there are lots of wonderful tutorials in the YouTube channel, but we'll add a basic transition here to show you the process. A transition is simply a way of connecting two items in your Timeline, two video clips, two audio tracks, two photos, etc. A dissolve or fade between two clips is an example of a simple transition.
In the Library, select Transitions. You'll see further effect categories nested below, such as "Light." Click on any effect to preview it. When you find one you like, drag it to the beginning or end of a clip in the Timeline. You can even replace an existing transition this way. Finally, set the transition duration or remove a transition completely by dragging the edge left or right. For a simple fade or dissolve, just drag the transition handle that appears when your mouse is over the edge of a clip.
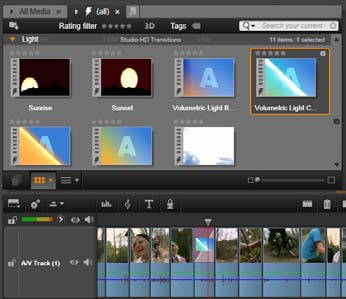
Adding a Transition effect from the Library (click to enlarge).
Now try adding an effect. Double-click any clip on the Timeline to open the Effect Editor, then select an effect type and style, such as Camera - Old Film (hover for a preview), and apply by clicking it. Next, edit the effect parameters, such as the amount of grain, dust and scratches for Old Film, as desired. Finally, click the Play button for a preview and click OK to finalize your effect.
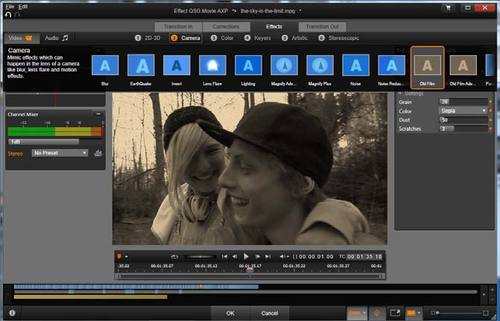
Adding the Old Film effect to a video clip (click to enlarge).
There are literally thousands of effects to choose from, try some others. We especially recommend using the Pan & Zoom tools for photos, which allow you to create Ken Burns-style photo montages.
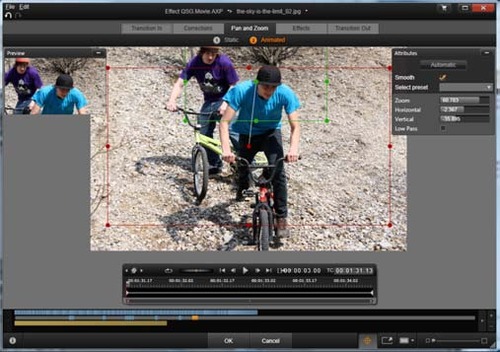
Using the Pan & Zoom tools on a photo (click to enlarge).
Share Your Movies
Once you've gotten your video the way you want it, the final step is to burn your movie to disc, upload it to the Web or save it for playback on most any device. To produce a DVD or Blu-ray Disc with interactive menus, click the Disc tab at the top.
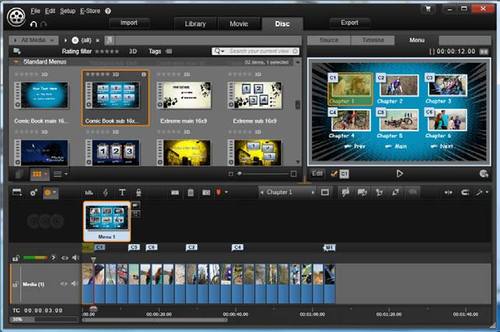
Producing a DVD or Blu-ray Disc (click to enlarge).
You can customize your disc in many ways, including adding background images and chapter titles. Don't have a Blu-ray burner? You can even burn special high-definition discs on DVD media that will play in your Blu-ray player. See our disc authoring tutorial for more.
For uploading to the Web, saving the movie to hard drive, or exporting it to your smartphone or tablet, choose the Export tab. Here, you can export to a file for playback on your computer, tablet, smartphone or game console, or upload it directly to Box or YouTube, in either standard or high definition. Use the handy presets or choose custom export settings.
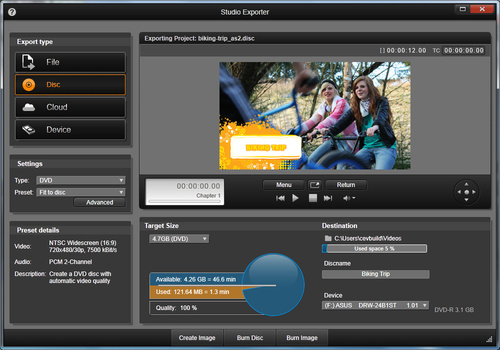
Exporting your movie to the Web or disk file (click to enlarge).
For more about all the many ways you can share your Studio productions, check out our complete export tutorial