For a truly exceptional holiday gift, try making a family video scrapbook on high-definition DVD or Blu-ray Disc. Take your summer vacation videos and photos and turn them into a treasured keepsake. Other good topics: weddings, graduations, birthdays and family reunions. Think about your source material, then let your imagination go!
With a video scrapbook, you can include photos, videos, captions, background music, titles, transitions and more. Basically, the same kinds of enhancements you might put in a paper scrapbook, but with music and videos too, and displayed in full 1920x1080 resolution on your HDTV using a standard Blu-ray player. Even better, it costs virtually nothing but time!
While we're calling it a scrapbook it's really just a standard video DVD or Blu-ray with menus, where some of the "videos" are actually photo slideshows, and others are regular home video clips. Here's how to get started:
Step 1: Gather Your Materials
First, gather all the materials you'll be using in your scrapbook: photos, videos, ephemera like ticket stubs and postcards, appropriate music, and so on. If needed, scan printed photos and ephemera, and transfer videos from VHS to digital. Learn how to transfer videos with Toast.
Step 2: Create Your Slideshows
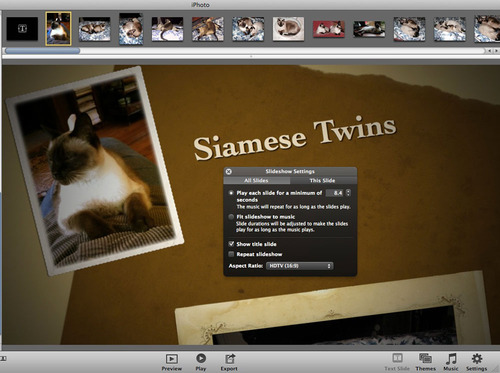
Next, use iPhoto® 11 to create photo slideshow(s) with your chosen theme and background music. You can customize transitions, add text titles or captions to any slide, and even use voice narration instead of music. Make sure to choose "HDTV" for Aspect Ratio in the Settings at lower left. Learn how to make an iPhoto slideshow.
iPhoto Slideshow settings with HDTV chosen (click to enlarge).
Step 3: Export Your Slideshows
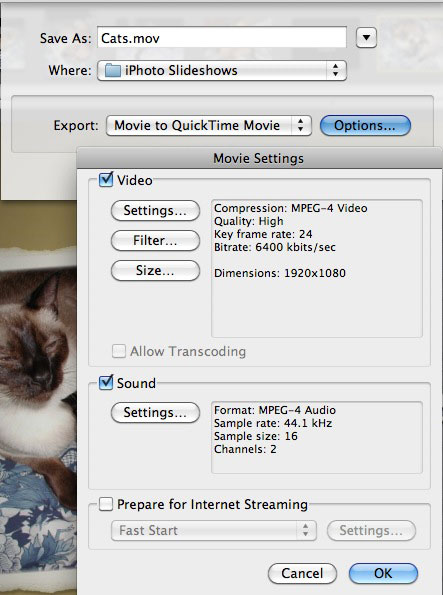
Once your slideshows are done, export them from iPhoto using the Export button at the bottom of the screen. Choose "Custom" settings, then "QuickTime" export, and finally choose MPEG-4 compression for both video and audio, as well as a size of 1920x1080 for highest quality. Learn more about exporting iPhoto slideshows.

QuickTime export options for iPhoto.
Step 4: Assemble Your High-Definition DVD or Blu-ray Disc
Now it's time to put it all together into a finished disc! This is where Toast 11 comes in. Choose the Video project tab, and either High-Definition DVD-Video or Blu-ray Video, depending on your burner and blank media. Then drag your exported slideshows and home video clips into the Toast window, or choose them using the Media Browser.
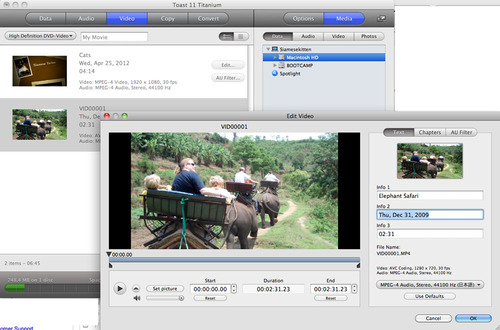
Next, arrange the videos in the desired order by dragging up and down within the window. To trim unwanted portions of videos, click the Edit button (watch tutorial). This is also where you can edit video titles and choose a still frame for each movie that will appear in your disc menu. Learn more about making high-definition discs with Toast.
Editing a video in Toast 11 (click to enlarge).
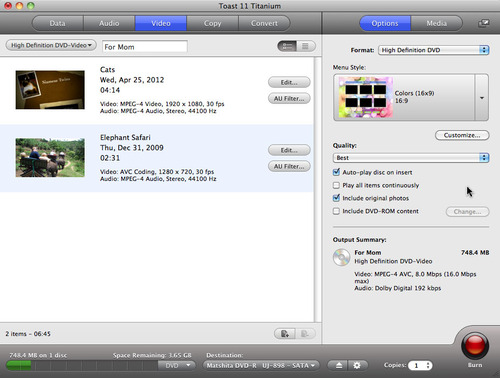
Finally, choose a background theme and title for your disc, as well as other options, on the right side of the Toast window. Then click the Burn button to write your disc. Save your project in case you want to make changes later, and be sure to make extra copies for the rest of the family!
Toast disc authoring options are on the right (click to enlarge).


