Today's home photo printers can yield just as good results as retail photo labs, and with much more control. Want to print on matte or rag paper? Use greeting card paper stock? Add text or captions for scrapbooking? All are easy when you do it yourself. But getting the best quality out of your printer requires some knowledge of resolution and dpi, ink and paper types, and color correction. Here's what you need to know to make pro-quality photo prints.
1. Use the highest quality camera settings on your camera
Great prints start with great images. Always set your camera to the highest resolution (number of pixels) and quality (compression level) it can capture. Typically this will be set in a menu on the LCD screen, like that of the Canon camera below. High-resolution images take more space, and will reduce the number that can fit on a memory card, but today's memory cards are so big and inexpensive that if you expect to run out of space before you get to a computer, it's best to simply buy another card.
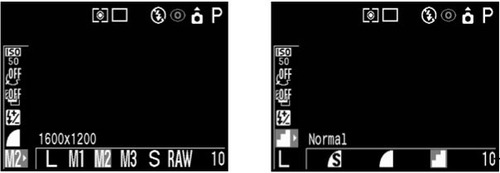
Resolution and quality settings for a Canon camera (click to enlarge).
Also get to know the other image settings on your camera, such as scene modes and white balance. To learn more, check out CNET's excellent guide to scene modes, and Darren Rowse's white balance tutorial. With the right exposure, your pictures will shine on-screen and in print.
2. Scan at the right resolution
For printing images from older negatives or prints, it's critical to use the right scan settings. Most scanners have an automatic mode, where you simply select "document" or "photo" and the scanner software figures out the rest. For more control, switch to your scan software's expert or professional mode, so you can set the parameters directly.
For example, when scanning a print that will be enlarged, scan at a higher resolution than normal to give enough detail. Ideally, you want to end up (after editing and cropping) with an image that matches the native resolution of your printer (typically 240 or 300 dpi). Adjust the scan resolution accordingly. Scantips.com has a detailed tutorial.
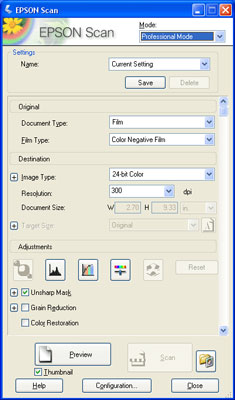
"Professional" scan settings for an Epson scanner (click to enlarge).
3. Correct exposure and color problems
Now that you've got high-quality source images, it's time to enhance them. Older scanned photos will typically have fading and color balance issues which can often be corrected with automatic tools in your favorite photo editor, such as the Tint tool in Roxio PhotoSuite (part of Creator 2010), or the Enhance tool in iPhoto.
Newer photos taken with digital cameras and cameraphones often have contrast, brightness or saturation problems. It's best to head these issues off by learning about scene modes and white balance (see Tip 1), but if you still have problems, they can also be fixed in your photo editor. PhotoSuite has tools for Brightness & Contrast, Saturation and Exposure, including both manual and automatic fixes for exposure and saturation. iPhoto's Adjust tool has manual controls for these.
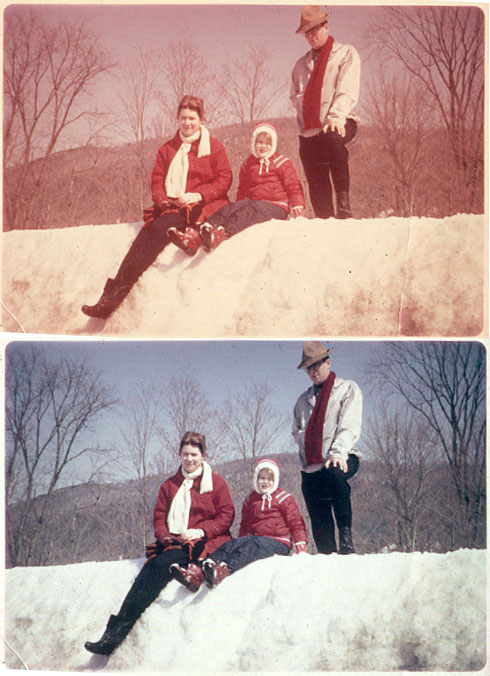
A faded photo fixed using color-correction tools (click to enlarge).
4. Remove dust & scratches
Scanned images, especially negatives, will also often have visible dust and scratches that can be corrected with your editing software, such as PhotoSuite. While you're at it, also remove red-eye with the simple tools in most editors. Our PhotoSuite tutorial tells you how to do both.
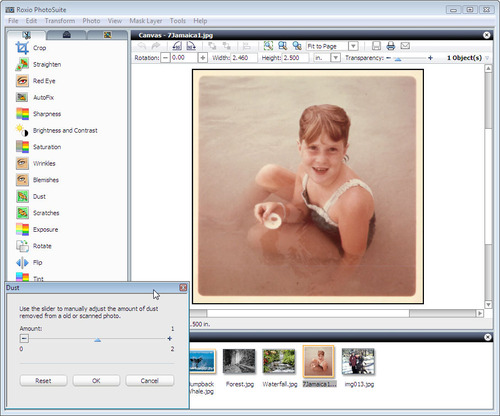
Removing dust from an old image scan with Roxio PhotoSuite's Dust filter (click to enlarge).
5. Crop and frame your photo
Fixing your image and removing dust and scratches will do a lot for your prints, but sometimes the biggest improvement will come simply from better cropping or framing of the subject. Tightening the crop will immediately make a difference in most pictures, and in others, putting the subject off center can add artful interest. Check out the Digital Photography School's tutorial on "Cropping for Impact" for more.
You can also crop to fit a particular frame or print size. Just make sure you get the proportions exact, the image will be scaled as needed during printing.
Finally, invest in a paper cutter. You'll be able to accurately cut prints to fit your mat or frame, cut out greeting cards or scrapbooking materials, and divide multiple-print pages with ease (see Tip 10).
6. Choose the right ink and printer
If you don't already have a "photo-quality" printer, usually with multiple color ink cartridges, you may want to invest in a better one. Very good photo printers can be had for well under $100 these days. The ongoing ink cost is often the bigger expenditure. But for top-quality prints, ink makes a huge difference.
The so-called "archival" inks found in better photo inkjets are formulated to withstand exposure to sunlight and resist smudging and bleeding. Some are even waterproof, and may be guaranteed to last for a certain number of years (assuming you use matching archival-quality paper).
Below is an image from a test of inkjet durability that illustrates the range of fading found with different inks and papers.
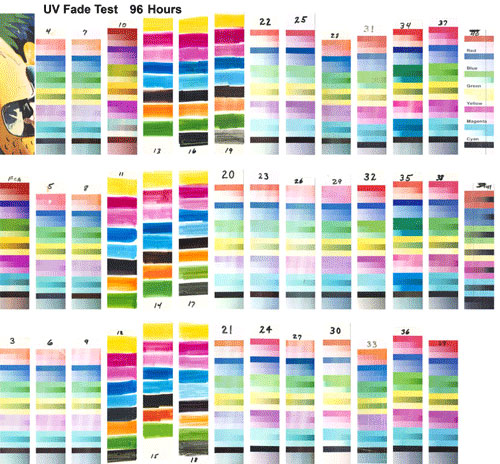
Inkjet print fading tests under UV light (click to enlarge).
7. Choose the right paper
As with ink, archival paper is the best choice for photos you intend to keep or display for the long term. But beyond durability, also check out the different paper types on the market. Each printer vendor has an array tailored to match their printer and ink characteristics, from high-gloss white to velvety semi-gloss to matte.
The Fine Art papers offered by Epson are especially good for black and white prints and old-time or artisan-quality effects with their heavy weights and cotton content. Check out these paper guides from HP, Epson and Canon.
8. Choose the right print settings
After selecting your ink and paper, make sure to choose the right print settings for them. Most printers have options in the print dialog boxes on both Mac and Windows for selecting paper type, resolution, print quality level, color etc. Go through all of these options and learn what they mean. Try some test prints to see the difference.
Your photo editing program may have further print settings, such as "print profiles" and color management (calibration) tools that help ensure the colors you see on the screen are what you get on the print.
9. Make old-timey prints
Now that you know the basics of how to get good prints from your home inkjet, it's time to get creative! With PhotoSuite, or your favorite image editor, you can take digital camera photos and make them look like old-fashioned prints with ease.
We wanted to take the middle photo below and give it a similar soft framed and airbrushed look to the left photo, which dates from the 50s. We also had an antique silver oval frame to put it in. In PhotoSuite, we used the Mask/Cutout by Shape tool to crop out the oval shape and give it a soft feathered edge. Then we also used the Selenium option in the Special Effects tool to give it a gray tint. After printing on heavy matte fine art paper with archival ink, we had a photo perfect for framing.
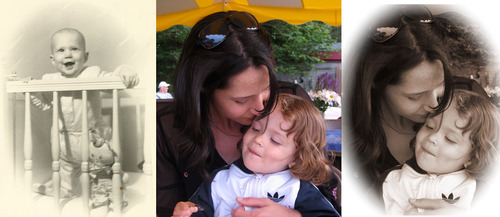
New image (center) masked and tinted to resemble an old photo (left) (click to enlarge).
10. Print multiple photos per page
Finally, printing at home makes it easy to create various sizes and extra copies of your photos to give to family and friends. Most photo editors, including PhotoSuite and iPhoto, have page layout tools that let you print multiple copies on one page, conserving expensive photo paper. Why print just one 5x7 when two will fit on the page easily? PhotoSuite has literally dozens of print templates for fitting combinations of photo sizes on a page, such as one 5x7 plus five 2x3s. Share your photos!
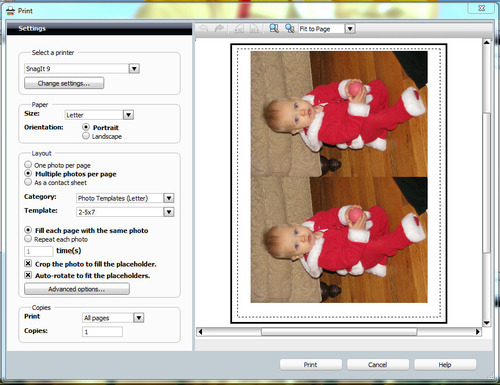
Printing multiple photos per page with Roxio PhotoSuite (click to enlarge).