Chances are you've already moved on to HDTV, but what about all those piles of home movies and old TV shows you have recorded on VHS tapes? It's time to bring them into the digital era by recording them to your PC. With Creator 2009 and the add-on Roxio USB Video Capture hardware you can burn them to DVD, convert them for playback on your portable player, or upload them to YouTube. You can also edit your recordings, add titles and transitions, and create projects combining analog footage with that from digital camcorders.
The USB Video Capture hardware integrates seamlessly with the various programs in Creator 2009. It consists of a small USB stick with connections for both composite and S-video sources. Simply install the driver software and plug in the USB stick when prompted, and you're ready to start transferring your tapes.
USB Video Capture is not just for tapes, though. Here are some common analog video sources you can record using the device:
- VHS tapes from your VCR
- Analog camcorder output (VHS, S-VHS, 8mm or Hi-8)
- The composite or S-video output from your TV (when viewing live standard-definition channels)
USB Video Capture is also perfect for recording shows from standard-definition DVRs that don't have PC transfer capabilities. Otherwise your shows are trapped forever in the DVR. (If you're lucky enough to have a networked TiVo, see our tutorial on burning TiVo shows with Creator here.)
Here's how to get started with USB Video Capture and Creator 2009:
Step 1: Capture Video to Your PC
After you've installed the capture device, connect your analog source to the USB stick using a composite or S-video cable. Now open Creator, and choose the Video-Movies tab. You'll see the following list of tasks:
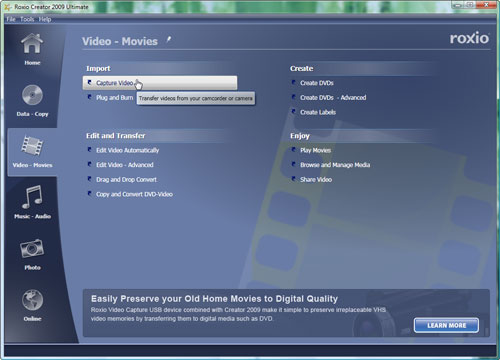
The Creator 2009 Video-Movies task list. (Click to enlarge.)
To transfer tapes to DVD, you can choose either "Plug & Burn" or "Capture Video" under the Import heading. Plug & Burn is best for when you want to go directly from tape to DVD as quickly as possible, without editing the video or saving it to your hard disk. It only takes a little longer than playing back your video to complete the burn, and is the fastest way to transfer a large number of tapes.
To use Plug & Burn, you simply insert a blank DVD, choose a menu style and title if desired, a quality level (1 hour of high-quality video will fit on a single-layer DVD, 2 hours on a dual-layer disc), and start capturing direct to DVD. You can capture multiple pieces of video, up to the capacity of the disc, then click "Finish" to finalize the burn. That's all there is to it!
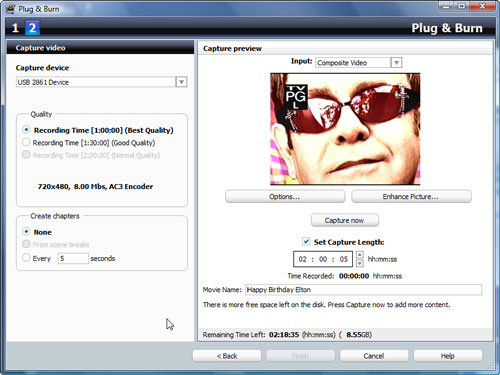
Transferring a video to DVD with Plug & Burn. (Click to enlarge.)
If you want to do more with your recordings, such as edit them, upload them to YouTube, or convert them for playback on your iPod or PSP, it's best to use the Capture Video option, which saves your recordings to hard disk for subsequent use in all types of projects, including burning DVDs. This option also allows you to select other digital formats than MPEG-2 (the DVD format), such as AVI and VCD. It takes longer to transfer a tape to DVD with Capture Video, since capturing and burning are separate processes, but if you have the hard disk space, and think you might want to do more with your video than just burn a DVD, the extra time is worth it.
Choosing "Capture Video" from the Video-Movies screen brings up the Media Import application, as shown below. The first task is to select your video capture device from the drop-down menu. (If your PC has a built-in webcam, that will usually be the first device in the list.)
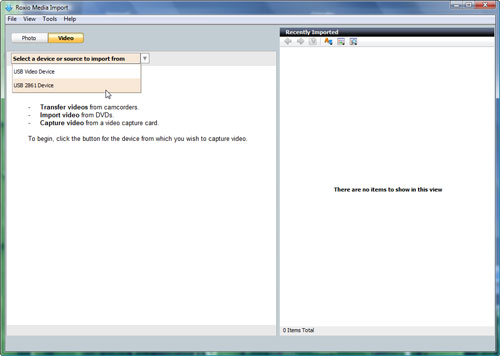
Selecting your video capture device. (Click to enlarge.)
After you select your USB stick, you'll see a preview window of the video currently being played on your source (VCR, camcorder, TV or DVR). (You may need to choose either Composite or S-video from the Input menu if you don't see a picture.) Before you click the Capture button to start recording to hard disk, choose a format (such as DV, DVD HQ, DVD SP, DVD LP or VCD). If you want to edit your video in VideoWave or CineMagic, choose DV. If you only want to burn DVDs, we recommend recording in DVD HQ format for top quality if you have the disk space (Media Import will tell you how much space you have available). Otherwise you can choose one of the more-compressed (lesser-quality) options, such as DVD SP and LP. You can fit about 1 hour of HQ, 1.5 hours of SP, or 2 hours of LP video on a single-layer DVD. Dual-layer discs hold twice as much.
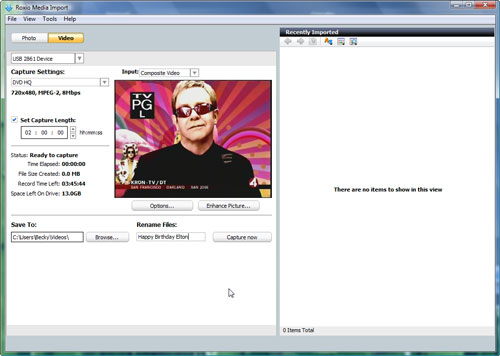
Setting up your recording. (Click to enlarge.)
Other options to choose include a capture length (so you can record unattended), a title for the recording, and video enhancements like contrast and brightness. Now click the Capture button to start recording. You'll see the progress of the recording in the Status area. When it's done, the finished video will be saved to your Videos folder (or whatever destination folder you selected), and will show up in the thumbnail list at right. Keep recording videos in this manner until you have all the material you need for your project.
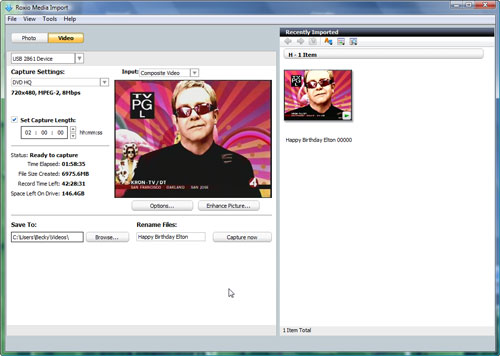
The finished recording in the movie list. (Click to enlarge.)
Step 2: Burn the Recording to DVD
Now that you've digitized all your videos, it's time to burn them to DVD. Go back to the Video-Movies screen, and choose "Create DVDs-Advanced." This will start the MyDVD application, which is a full-featured DVD authoring package.
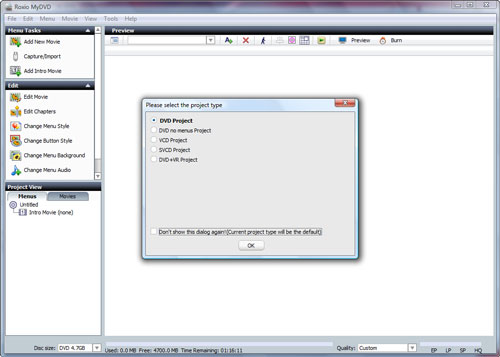
Starting up MyDVD and selecting a project type. (Click to enlarge.)
MyDVD will first ask you to select a project type, such as a standard DVD with menus, or a DVD without menus that starts playing automatically when you insert it in your player. Next, add your recordings to your project by clicking the Add Movie button and selecting them from the browser. Add as many movies as you need for your project. They will appear in a list at lower left.
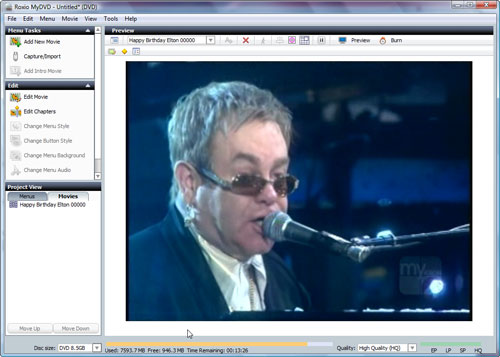
Adding the recorded movie to the DVD project. (Click to enlarge.)
If desired, you can now customize your DVD with menu styles, titles, backgrounds and chapter markers. See our MyDVD tutorial for more on what you can do with MyDVD. Once you've gotten the DVD the way you want it, press the Burn button at top right.
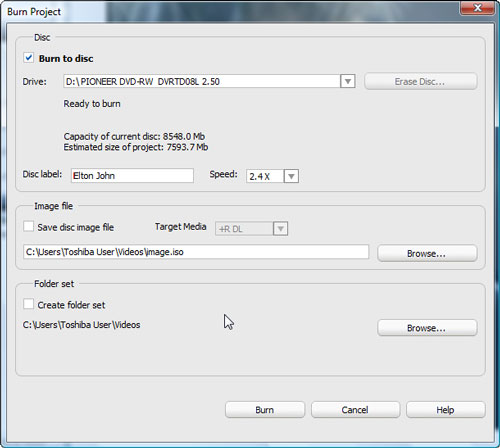
Burning the DVD.
In the Burn dialog box, you can choose your recording speed if desired, and enter a label for the disc. You can also save to an Image File on your hard disk, which is useful if you may want to burn additional copies of the disc later, or prefer play it back from your hard disk or media server.
Step 3: Do More with Your Recordings
Capturing video and burning it to DVD only scratches the surface of Creator 2009's capabilities. Once you've captured videos to your hard disk, you can also do things like:
- Trim and cut out unwanted portions from your recordings.
- Add titles, transition, soundtracks and more in VideoWave, the full-featured video editing program included with Creator.
- Convert them for viewing on your iPod, iPhone, PSP, or other portable player
- Post them to YouTube
- Share them online on your own secure Web page with Roxio PhotoShow.
Finally, Creator 2009 also includes disc label creation software, as well as the popular LP & Tape Assistant program for digitizing analog audio. Once you've converted all your old analog video and audio to digital, you'll never go back!