It happens to everyone. You install some new piece of software or update an old one, and suddenly weirdness ensues. Or the kids play around and throw your copy of Microsoft Office in the trash. In the worst case, your hard drive dies. Now there's an easy-to-use program that will undo the damage caused by software conflicts, malware, accidental deletions and hardware failures: Roxio BackOnTrack, a complete backup and disaster recovery tool. BackOnTrack is available separately, or as part of the Creator 2009 Ultimate suite.
BackOnTrack can schedule backups of selected data, or one-time backups of entire drives, and create disaster recovery discs that boot your computer while you restore from your backup. Backups can be made to CD, DVD or Blu-ray Disc, or to external or network drives. For total protection, first create a disaster recovery set, then perform regular scheduled backups of your data files.
Here's how to get protected:
Create a Disaster Recovery Set
First, open BackOnTrack by choosing "Backup Drive" from the Roxio Home screen Data-Copy tab.
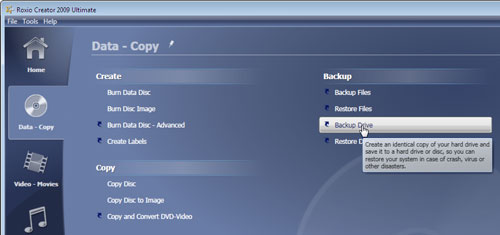
Choosing "Backup Drive" from the Creator 2009 Data-Copy tab.
You'll be taken directly to the Backup Drive task in BackOnTrack. Select "Disaster Recovery Set" from the drop-down menu at the top, and choose a destination for the set, such as an external or networked hard drive, or a DVD recorder.
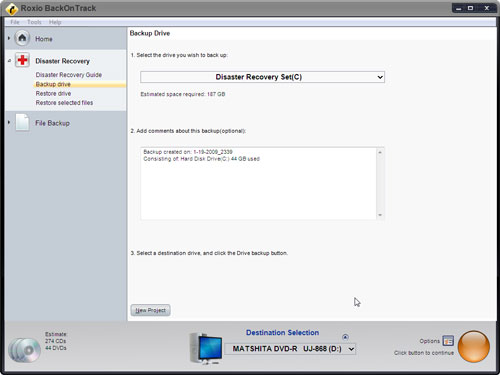
Creating a BackOnTrack Disaster Recovery Set (click to enlarge).
Now click the Record button at bottom right. If you chose DVDs (or Blu-ray Discs if you have a Blu-ray recorder and the Creator HD/BD Plug-in), you'll be prompted to insert as many discs as needed to complete the project. One of the discs will be an emergency boot disc. The others will contain the entire contents of your hard drive, including the system, so you can restore the full drive if necessary. Perform a new full drive backup every so often to keep up with major changes to your system and applications. If disaster strikes and you need to restore your drive, insert the recovery disc and then follow the on-screen directions.
Schedule Regular Backups
Now that you have your full disaster recovery set tucked away, also schedule regular backups of your working files like documents, email, music, photos and video. These will take much less space than the full drive backup. Network or external drives are perfect for scheduled backups since they can run unattended. If you want use DVD or Blu-ray Discs, you'll need to be present to insert them at backup time, or make sure a blank disc is in your drive.
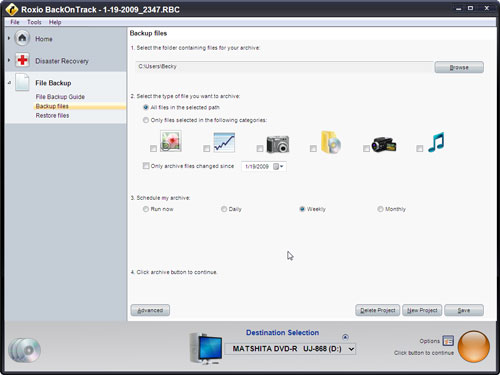
To schedule regular backups, choose the File Backup task in BackOnTrack, then select the folder or types of files you want to backup. Also select a frequency (daily, weekly or monthly), and choose the destination drive from the menu at the bottom of the window. Then click Save to save your backup project. Note that BackOnTrack will not overwrite existing files at your destination, so you may want to use two rotating backup discs or drives, and erase the older backup each time.
Starting a System Restore operation (click to enlarge).
To save space, or make sure noone can read your backup files, you can also compress and/or encrypt your file backups. Click the Advanced button to set these options. If you choose to encrypt your backups, be sure to store the password in a safe place. Your data will not be accessible without it.
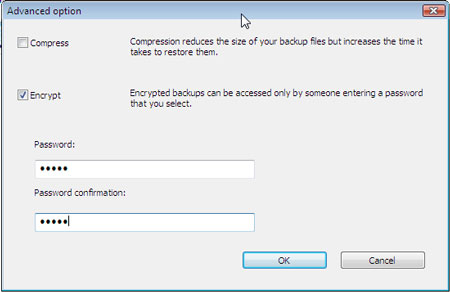
Compression and encryption options for File Backup projects.
Restoring Files
To restore files from your scheduled backups, first find the backup file (which will have a .sib extension), and double-click on it. BackOnTrack will then launch, with the Restore Drive project selected. To perform a selective restore, switch to the Restore Selected Files project and follow the directions. If your Back Up Drive project is saved on a set of discs, the catalog for that backup set is contained on the last disc in the set. The Restore Selected Files project will ask you to insert this disc so it can find the files or folders you want to restore.
Now that you've seen how easy it is to get protected with BackOnTrack, make a New Year's resolution to backup regularly!