Backing up your precious family data is one of the most important things you can do. Just imagine the possibility of losing your irreplaceable digital photos or videos in a disk crash or natural disaster—that should be enough motivation to get started on a backup plan! And the New Year is the perfect time to do it. Thankfully, Toast 10 Titanium offers three simple ways to keep your data safe:
• First, Toast 10 includes Get Backup 2 RE, a powerful, yet easy-to-use utility that helps you schedule automatic backups of selected files and folders to a local hard drive, a network volume, or to a blank CD, DVD or Blu-ray Disc.
• Second, Get Backup lets you automatically synchronize folders between two machines, so you'll always be up-to-date.
• Finally, for everyday quick backups, you can just drag and drop files and folders into a Toast Data project window and press the Record button to burn them to a CD, DVD or Blu-ray Disc, or save them to an image file on your hard drive. (Blu-ray recording requires the High-Def/Blu-ray Disc Plug-In.)
With any method, you can also use Toast 10 Titanium's unique ToastAnywhere feature to burn CDs, DVDs and BDs to networked recorders, a perfect solution for sharing an expensive Blu-ray recorder among multiple Macs. Below, we'll show you how to use each of these powerful backup tools.
Using Get Backup
Using Get Backup 2 RE, you can back up any number of files or folders manually at the click of a button, or automatically on a scheduled basis. To get started, just open Get Backup from the Toast folder. You'll be presented with the following window:
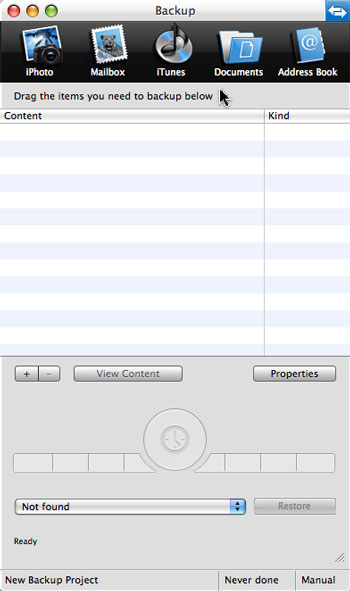
The main Get Backup window.
To create a backup project, simply add the files and/or folders you want to back up to the list on the right by clicking the "+" button at middle left. You can also click the handy icons at top to add some common folders. Your screen should now look something like this:
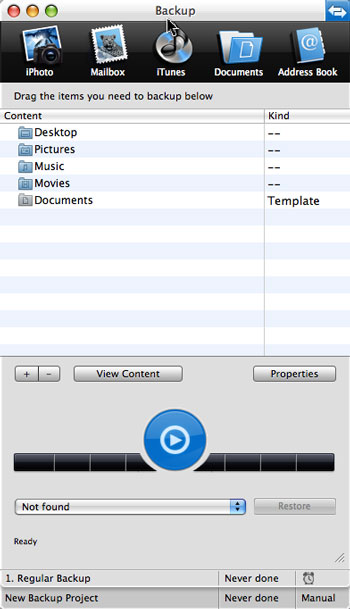
The Get Backup window showing various folders in a backup project.
At this point you could simply click the blue backup button to start burning. But first, hit the Properties button at middle right and take a look at the options. Here you can choose the destination for your backup, such as a DVD, external hard disk, or even a network drive, as well as the backup method: full, incremental, or versioned (where old versions of files are not deleted when changed). You can also choose to have your data compressed, which greatly reduces space needs (Get Backup uses the standard TAR file format for archives and GZIP format for compression, so backups can easily be opened by other utilities). Finally, you can set your backup to perform on a regular schedule (more on this below).
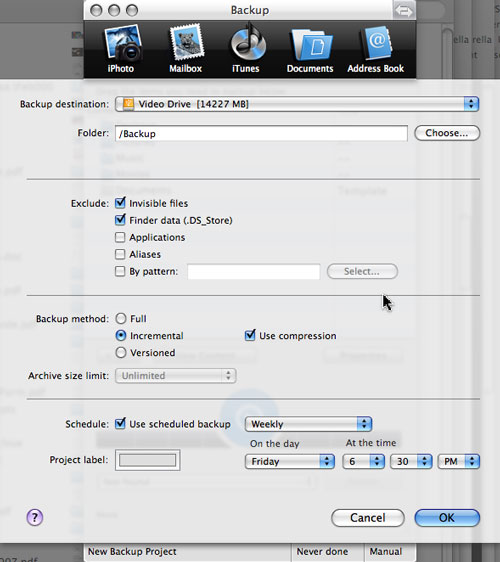
Setting the destination and format for your backup.
Scheduling Backups
To schedule a backup so that it runs automatically, click the Schedule button at the bottom of the Properties window, then select a daily, weekly or monthly interval, and a time of day.
To make sure your backup runs even if the program is not open, you also need to open Get Backup Preferences and check the boxes for "Enable Schedule" and "Use Agent" at top right. With these boxes checked, a background agent will launch the utility at the appointed time and begin the backup process.
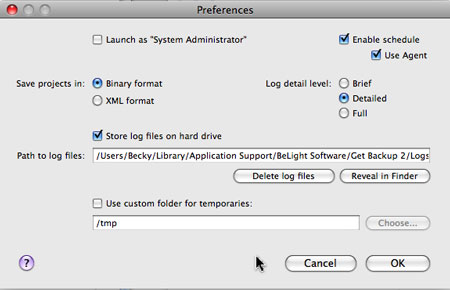
Setting Get Backup Preferences.
Note that you don't have to have Get Backup open for scheduled backups to take place, but they may not occur if your machine is sleeping/hibernating. You can change your Energy Saver system preferences to prevent this from happening.
Synchronized Backups
Clicking the double arrows in the top right corner of the Get Backup window takes you into folder synchronization mode, where you can set up sync jobs on a daily, weekly or monthly schedule.

Creating a synchronized folder.
To set up your sync job, simply choose the two target folders using the buttons at the top. The contents of the folder will then appear in the list below, and you can click the blue button to perform the sync. Also choose the direction of syncing using the drop-down arrows in between the two targets. You can sync in one direction (keeping the source folder unchanged), or two-way.
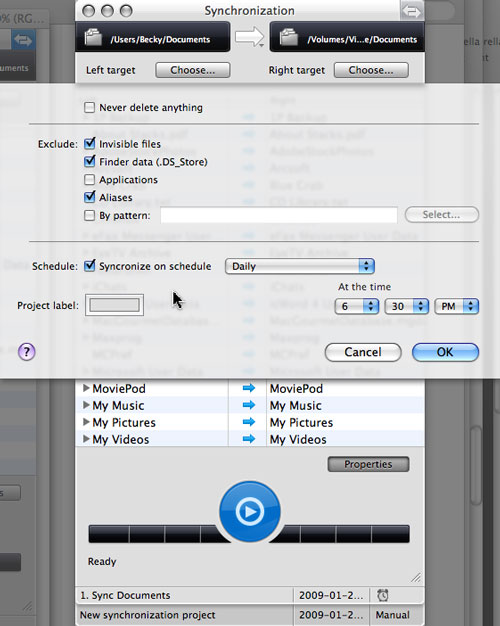
Scheduling your synchronized folder.
To schedule folder syncing, click the Properties button. You'll see options for daily, weekly and monthly syncs. As with backup jobs, you should make sure that the User Agent is turned on in the Preferences window.
Finally, note that you can set up multiple backup and synchronization projects with individual schedules for each. Just click the New Project tab at the bottom of the window to start a new
Using ToastAnywhere
Toast 10 Titanium's ToastAnywhere feature lets you share CD and DVD recorders over a network (or the Internet), so you can back up even if you don't have a CD or DVD recorder connected to your Mac. It's a perfect solution for small offices, schools, and home networks to share expensive resources like Blu-ray recorders.
Here's how it works: both the sending and receiving computers need Toast 10 Titanium installed, and the receiving computer must turn on "ToastAnywhere Recorder Sharing" in the Toast 10 Preferences to share their recorder with other Toast 10 users on the network.
From there, the process is simple. As the sender, you set up the disc you want to burn in Toast just like you normally would, then select the shared recorder from the pop-up list when you click the Recorder Options button. To access a recorder on the Internet, choose "Other Shared Recorder," then enter the IP address of the remote machine (you may also need to adjust firewall and port settings). Finally, click the red Record button.
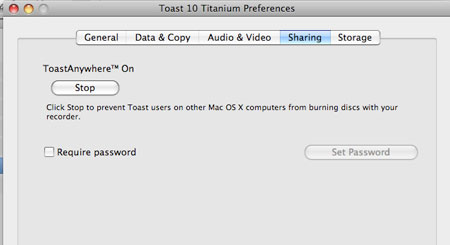
Share your DVD or Blu-ray recorder over a network by turning on the ToastAnywhere feature in the Toast Preferences window.
That's it. The person sharing their recorder will be prompted to insert a blank disc, and Toast will then record your content to disc over the network. Of course, Toast must be also be open on the remote machine.
Now that you know how to use Toast 10 Titanium to back up and synchronize your precious media files, you can keep those New Year's resolutions!