Want to set the right mood for your videos? Create a Hollywood-style soundtrack with SonicFire Pro, part of the Creator 2009 Ultimate suite. Music and sound effects can turn a ho-hum video into a riveting thriller or an uplifting story, but few of us have the ability to record our own backing tracks. With SonicFire's huge library of professionally produced music in styles ranging from classical to hip-hop, you can create the perfect soundtrack without knowing how to read a note.
SonicFire's unique mood-mapping technology lets you automatically generate music that follows the action in your videos, getting softer, louder or more intense to fit your script. Want the music to lower behind your dialog? No problem, just add a mood point. You can add sound effects too, using the powerful multi-track editor.
In this tutorial, we'll be editing a soundtrack for a wedding video created with CineMagic (another program in the Creator suite). It's about 5.5 minutes long, and includes highlights like the walk down the aisle, the exchange of vows, and scenes from the reception. We decided to create a whole new soundtrack for several reasons. First, while there was music in the church and reception, it didn't record very well. Second, since our edited video only included snippets of each scene, there was no continuity in the music. Finally, the clips from the reception had a lot of crowd noise.
All these problems are typical of home video editing. In these situations, it's best and easiest to simply toss out the audio (except for key dialog or musical performances), and then add your own backing track. Here, the only bits of dialog we'll be keeping are the wedding vows and best man's toast. Around that, we'll add a soundtrack specially generated by SonicFire to match the length, mood and theme of our video.
Step 1: Import Your Video
To start, choose SonicFire Pro from the Windows Start menu (in the SmartSound folder). The program will open to a blank project. Next, import the video you want to create a soundtrack for, by clicking the "Choose Video" button at lower left. Ideally, your movie should be completely finished except for the audio, since you will be matching the soundtrack precisely to various points in the video. If you later make changes to your video that affect the length or key points in the action, you'll probably also have to go back and regenerate the soundtrack.

Importing a movie into SonicFire Pro. (Click to enlarge.)
You can import your video in many popular formats, including AVI, MOV, MPEG-1 and WMV. If you have DV or AVCHD-format video from a digital camcorder, first use the Video Copy & Convert tool (found under the Video-Movies tab on the Creator home screen or in the Roxio Applications folder in the Start menu) to convert it to one of the supported formats.
If you have to convert your video, don't worry, you can still use the original high-quality video in your finished production; SonicFire simply employs the imported video as a reference guide for producing the soundtrack, which you will add back to your original video later in VideoWave.
While our wedding video was originally shot in DV, the edited version was created in CineMagic and saved in MPEG format, so we were able to import it directly without conversion. After import, your video will appear in the bottom right pane of the SonicFire window, and you can play it back at any time to locate particular points in your video and see how the soundtrack syncs up to the action.
Step 2: Select Your Main Background Music
Now comes the fun part, choosing music from the vast SmartSound libraries. A set of "Core Foundations" tracks come with SonicFire Pro, covering a wide range of styles. These will be all most home users need for occasional editing, especially since they can be supplemented with music from your own audio CDs.
But to take advantage of the full power of SonicFire Pro, such as ability to generate music that changes in mood and intensity along with your video and matches the length of every scene perfectly, you'll want to explore the full SmartSound library. To preview and choose music for your soundtrack, click the Maestro button at top right.
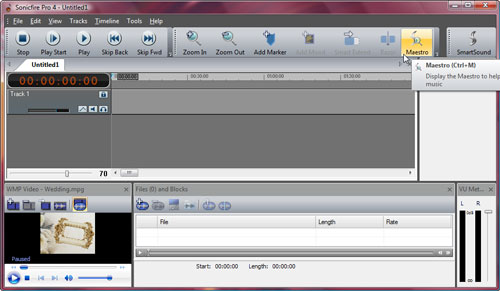
Opening the SonicFire Maestro tool. (Click to enlarge.)
Now the Maestro window will pop up. Here you can browse around the SmartSound library, and listen to previews of all tracks available in the online store right from the program. If you find one you want to use, you can buy it individually, or as part of a set. The style and keyword search tools help narrow down your options. For our wedding video we wanted classical music that was uplifting. After listening to a few options, we chose Handel's Pavane. As well as fitting the wedding theme, Pavane has the added attraction of being a multi-layer track (indicated by the 3-line icon next to it), which means you can change the mood of the track over time. We wanted to have different moods for the church and reception scenes.
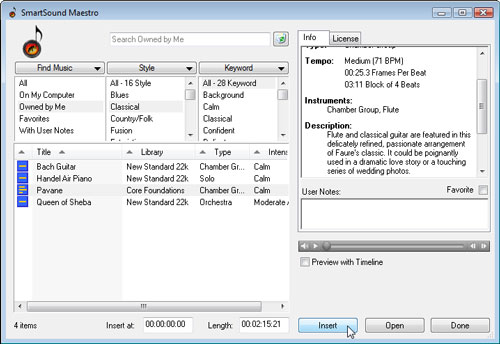
Choosing music via the Maestro window.
Adding the Original Soundtrack
While the SmartSound music would be used throughout, in place of the original church and reception music, we wanted to keep the actual spoken wedding vows. So we chose the "Import Video's Audio" tool at bottom left to bring it into our project.
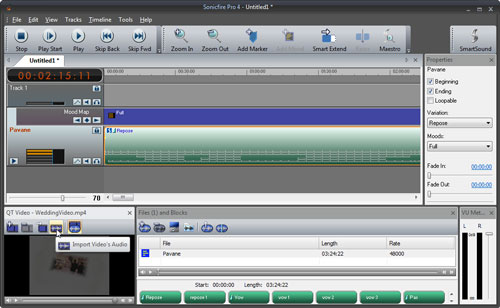
Importing the audio track from your video. (Click to enlarge.)
The track then appears in a list of available audio at bottom right, and you can send it to the timeline by selecting it and clicking the Insert button as shown.
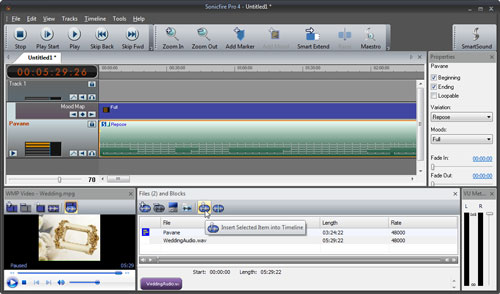
Sending tracks to the timeline. (Click to enlarge.)
Now that we have all our source music placed on the timeline, it's time to customize it. You could add yet more tracks, such as your own CD audio files or additional SmartSound music via the Maestro. One piece of music was enough for our 5-minute video. For longer videos, you might want different pieces of music for different scenes.
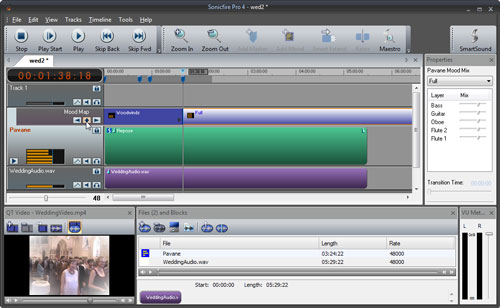
Customizing Your Soundtrack
The first step in customizing your SonicFire soundtrack is deciding where the key points are, such as where you want moods to change, where you want to use original dialog, and where you want to switch to new music tracks. Move the video playback head along the timeline to each of these points, then click the "Add Marker" button at top to mark them. The markers will then make it easy to select key portions of the soundtrack for customization.
Changing moods between the church and reception was our first task. We selected the Pavane Mood Map, and a list of possible moods appeared in the Properties pane at right. To begin, the mood is set as "Full," with all instruments playing. We wanted a sparser sound for the church, so we moved changed it to Woodwinds. Then we moved the play head to the marker we set earlier for the start of the reception, clicked the Mood Map button at left to signal a change of mood, and chose "Full" for the remaining section of the music. We could have tweaked it even further, with changes at more points along the way, such as when the cake was being cut, or the bride was entering the church. For a longer video, we would have. You can change moods as often as you like.
Changing moods. (Click to enlarge.)
The next task was to crop off all of our original audio save for the wedding vows. We simply dragged the ends of the WeddingAudio.wav track to the two markers we set earlier indicating the start and end of the vows. Then we played with the crossfade and fade-in/out tools at right until we got things sounding the way we wanted them. You can also change the volume of any track throughout the timeline by clicking the volume button next to the track name at left. This was useful in reducing the volume of the music while the dialog was playing.
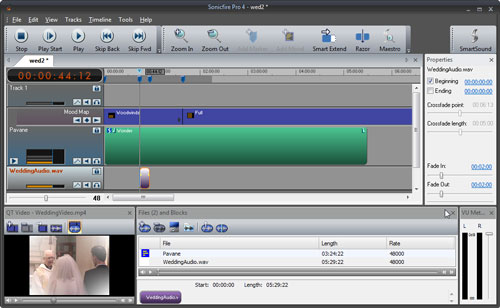
Editing the dialog track. (Click to enlarge.)
We were pretty happy with our wedding video at that point, but also wanted to explore another SonicFire feature: Variations. Variations are different versions of the same piece of music that can be placed back to back in longer pieces to provide variety (as opposed to repetitive sound loops). You can also use them somewhat like moods, to give a slightly different feel to your soundtrack. After listening to the options, we decided to go with a different variation than the original, called "Wonder."
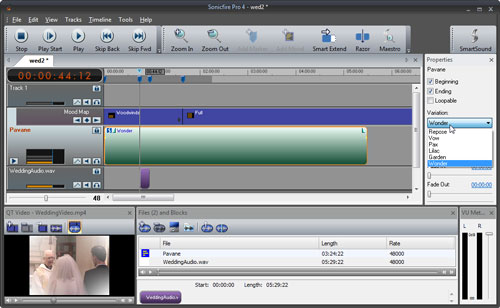
Choosing musical variations. (Click to enlarge.)
You could continue tweaking your video score with imported CD audio tracks, sound effects, and more. For the truly musically inclined, SonicFire Pro also has a slew of advanced features not mentioned here, such as the Razor tool and Smart Blocks, which let you break down SmartSound music into its basic components and rearrange them at will.
We'll stop here, however, and export our soundtrack. Depending on your project, you can simply export audio and video together, in one complete movie file, or export the soundtrack alone, to be added to the video later in VideoWave. Here, since our video is already in one of SonicFire's supported formats, we chose to simply output the video and audio together.
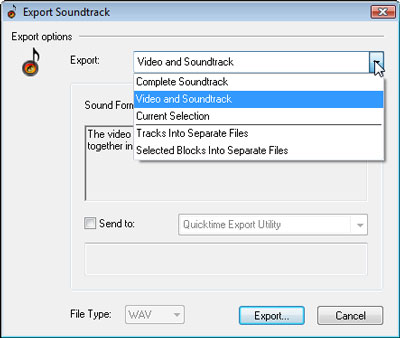
Exporting the finished movie with soundtrack.
Now that you the basic of SonicFire Pro scoring, give it a try! Take any home video and see how easily you can enhance it with audio. You'll be amazed at the results!