If you thought you needed a Blu-ray recorder in order to burn high-definition discs from your home movies, think again. Creator 2009 can burn HD video directly to standard DVD media using your regular DVD recorder, complete with customizable menu themes and navigation screens! These special AVCHD DVDs can then be played back on your Sony PS3 or many set-top Blu-ray players, for viewing on your HDTV's big screen. Of course, if you do own a Blu-ray recorder, Creator 2009 can burn to Blu-ray Discs as well, with the optional High-Def/Blu-ray Disc Plug-in.
If you've watched Blu-ray movies played on an HDTV, you know how breathtaking the quality can be. There is simply no comparison between the detail you get with full 1920-by-1080 HD video and standard 720-by-480 DVD resolution. Once you've experienced it, you'll likely never go back. And now that HD camcorders and DVRs are plentiful and affordable, more people are recording their home movies and TV shows in HD too. The best consumer HD camcorders can now record at up to 1920-by-1080i, almost as good as the 1920-by-1080p (progressive scan) resolution found on commercial Blu-ray movie discs.
So how do you get your home HD recordings onto your TV screen? Blu-ray recorder prices are still very high, at least $500 or so for an external drive, and media prices range from about $15 to $50 per disc, which can add up fast. After buying that HDTV, set-top Blu-ray player and HD camcorder, there's probably not much left in the budget for an expensive Blu-ray burner as well. While prices will come down eventually, if you want to watch your HD movies NOW, the answer is as close as Creator and your DVD drive.
With Creator 2009, you can burn your HD camcorder footage onto regular DVD media, in the same format as Blu-ray video, using the DVD burner you already have. These special high-definition DVDs can be played in most Blu-ray set-top players, including the Sony PlayStation 3, and you can fit up to an hour of HD video onto a dual-layer DVD. If you are lucky enough to have a Blu-ray recorder, you can also burn hours of video on a single or dual-layer Blu-ray Disc, using Creator 2009 and its High-Def/Blu-ray Disc Plug-in (or Creator 2009 Ultimate, which includes the plug-in). Even better, Creator's MyDVD application lets you edit your HD clips using a powerful timeline editor, and author discs with fully customizable HD menus and themes.
Getting Started -- Import Your Video
To author a high-definition DVD complete with custom menus, first open Creator 2009 and select the "Create DVDs - Advanced project option under the Video - Movies tab. This will launch the MyDVD application. (You can also launch it directly from the Windows Programs menu.) The application will start by asking what type of project you want to create. Choose "AVCHD Project" if you want to put HD video on standard DVDs, or "Blu-ray Project" if you have a Blu-ray recorder and want to burn a Blu-ray Disc (unless you have more than one hour of video, a dual-layer DVD is all you need).
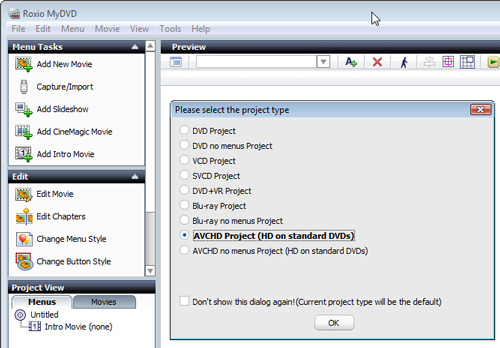
Choosing a project type in MyDVD.
Now it's time to import your HD video clips from your camcorder, if you haven't already. Click the Capture/Import button at top left to open the Media Import Tool. Then connect your AVCHD camcorder and set it to PC connect mode per the manufacturer's directions. When connected properly, it will show up in the device list. Select it, and you will see a list of available clips in the box at left, complete with thumbnail previews. Each clip is labeled with valuable information, such as the length, screen format, and resolution (1920x1080 or 1440x1080 for AVCHD clips). Finally, choose the clips you want to use in your project, and click the Import button at bottom. The import process will start, and the imported clips will be shown in the box at right. When you are finished importing, click the Done button to return to MyDVD.
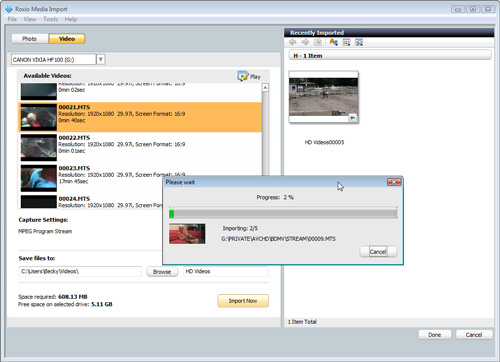
Importing clips from an AVCHD camcorder with the Media Import tool.
Adding & Editing Your Movies
The next step is to bring your clips into your AVCHD DVD or Blu-ray project. Click the Add New Movie button at top left, and select the movies you want to use in your project from your hard disk (hold down the Ctrl key to select multiple clips at once). The movies will now appear in the project window at bottom left. Don't worry about the order for now, you can arrange things later. First, check each of your clips to see if they need trimming or removal of unwanted portions by clicking the Movies tab in the Project pane (at lower left). Choose a clip to preview it. If you want to trim the clip, or add a title or soundtrack, click the Edit Movie button at middle left to switch to editing mode.
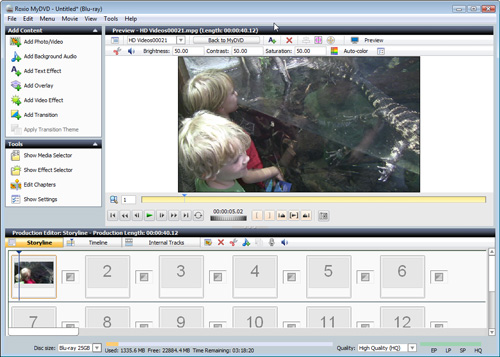
Editing a video clip in MyDVD.
MyDVD's editing mode includes a powerful timeline editor. We won't go into all the details here, but you can do things like add titles, transitions, soundtracks and special effects, as well as basic editing. If your movies are long, you can also add chapter markers, just like those on a commercial movie disc, using the Edit Chapters button at middle left. Most home video clips are relatively short, however, so you probably won't need to do this.
Customizing Your Disc
Now that you've added all your movies and edited them as desired, it's time to customize your disc menus. First, make sure your clips are in the sequence you'd like them displayed on your menu--use the Move Up and Move Down buttons under the Movies tab to change the order. Then click "Change Menu Style" to pick a theme for your disc.
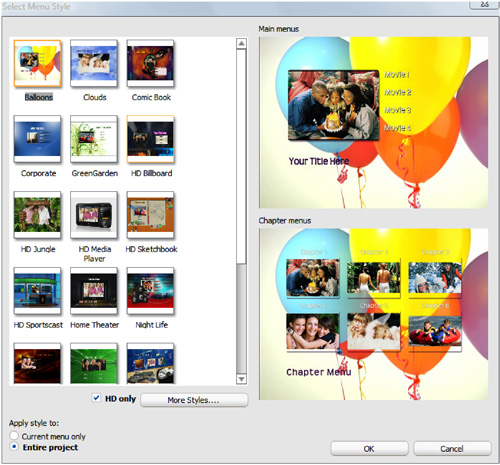
Choosing a menu theme.
You can choose from any theme, although we recommend checking the box to view the special HD themes only, which have been designed with HD's wider aspect ratio and higher resolution in mind. (If you choose a standard-definition theme, it will be stretched to the HD aspect ratio.) Next, edit the movie titles by clicking on them in the preview pane. You can change fonts and sizes as desired, and add additional text anywhere you like. Also experiment with button styles by choosing "Change Button Styles" at middle left.
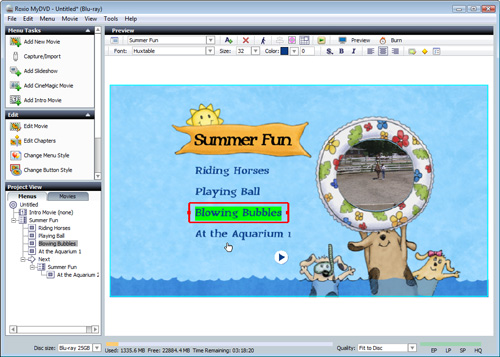
Editing movie titles.
Once you've edited your menus to your satisfaction, preview your disc by clicking the Preview button near the top right. You'll be presented with a fully operational disc emulator, so you can see exactly how your disc will play in your set-top player. If you find anything you want to change, go back and fix it using MyDVD's movie editing and disc authoring tools.
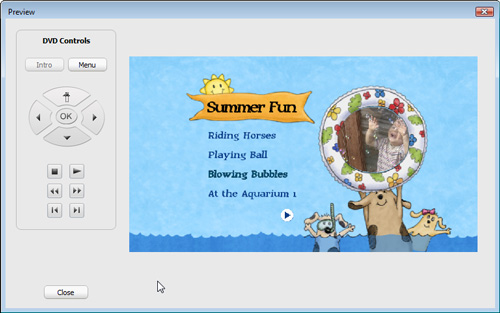
Previewing your disc project.
Burning Your Disc
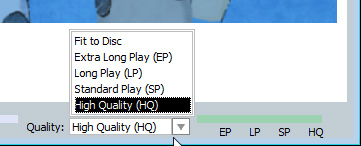
Now you're all done, except for burning! The bar at the bottom will show how much video you have, and whether it fits on your disc. If needed, you can choose a different disc size, such as a dual-layer disc instead of a single-layer disc. You can also specify a quality level. By default, Creator will fit your video to the disc size. If you want to make sure that it is encoded at a particular quality level, use the pop-up menu at bottom right. The Highest Quality encoding option takes longer, but is worth it if you have the time.
Disc encoding options.
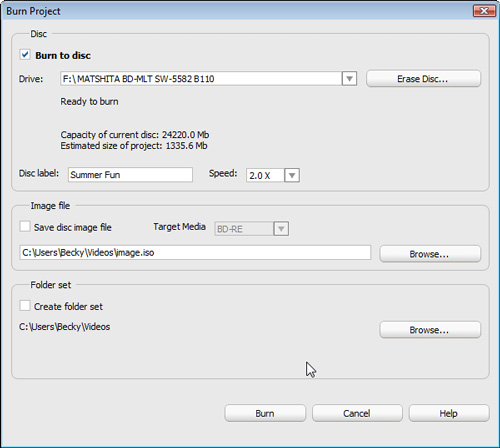
Finally, press the Burn button at top right, and select burn options, if desired. You can erase the disc if needed (for a rewritable disc), give it a label, and choose a burn speed. Be sure to use a burn speed that is supported by both your drive and media (not all media is rated for higher speeds). Choosing a lower speed may help avoid any problems while burning.
The MyDVD Burn window.
Once you press the Burn button, you'll see a recording progress indicator that shows the status of encoding and burning. Encoding usually takes longer than burning.
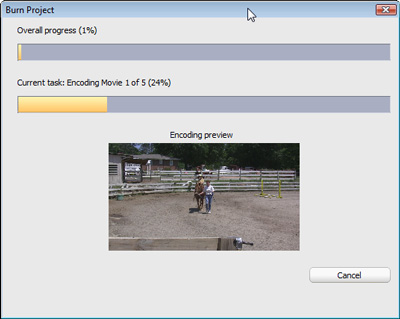
The MyDVD burn progress indicator.
Now it's time to enjoy your disc on the big screen! Pop it into your PlayStation 3 or other Blu-ray player, and let your whole family enjoy your home videos in all their HD glory.