Want to make DVDs out of your home movies, but don't know where to start? It's easy with MyDVD 10 Premier, which simplifies the process of turning your digital home video and photos into DVDs with professional-level transitions and animated menus. Thanks to direct camera input and a simple task-oriented interface, you can create "quick-and-dirty" DVDs with minimal fuss and maximum impact. At the same time, MyDVD provides for complete customization, so you can add your own buttons, transitions, overlays, text and other special effects if you want. Even better, it has native high-def capability, Dolby Pro Logic support and DivX disc creation, for top quality results. You can even export edited video to your portable player or upload it to YouTube. So take your DVD authoring to the next level with our step-by-step guide.
Capture Your Video Clips
The first step in any video project is of course to bring clips from your camcorder into your computer. To start, connect your camcorder to your PC with the USB or FireWire cable that came with it, and turn it on in the proper mode for computer transfer (usually the Playback mode -- see your camcorder's manual). Then, within MyDVD, choose File>Capture/Import. The Media Import tool will open, and you can select your camcorder from the device list and start capturing clips. Tip: First cue up your camcorder to the beginning of clip you want to capture, and pause it. Second, click the Capture button in Media Import to start the recording, and then press Play on your camcorder. There will be a few extra frames to crop out at the beginning of the recording, but this is easily done when you start to create your DVD.
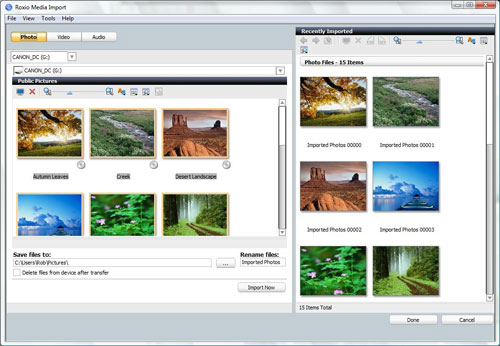
The Media Import window lets you import clips directly from your camcorder.
You can also use video from other sources, such as cell phone or digital camera movies, Web video downloads, and clips you may have recorded with a TV tuner card.
Beginning Your MyDVD Project
Now that you've gotten all your video onto your PC, it's time to start creating your DVD. Open MyDVD, and click the "Change Menu Style" button under the Edit pane to select an overall theme for your disc, such as "Birthday," "Safari" or "Snowing." This is what will appear on screen when you insert the disc into a DVD player. Menu styles consist of background images, button styles and placements, and font selections. Next, click the Add New Movie button. Select a clip or group of clips that you'd like to be accessed from the first button in your DVD menu. If you select a group of clips, check the box to import them "as one movie" when prompted.
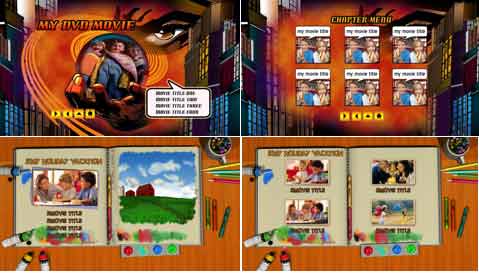
MyDVD 10 Premier comes with dozens of professional menu styles to choose from.
Keep adding movies until you have all your intended chapters. At this point, you may want to experiment with different typefaces and styles, or reposition some of the graphic elements. Simply drag elements to move them, or select them to change fonts or styles. There are dozens of available button styles, for example. To change the background image, choose the "Change Menu Background" option in the Edit pane.

A MyDVD project with three chapters in the main menu.
Editing Video Clips
If some of your video clips need trimming, or if you'd like to add special effects and transitions, select the video in the Preview area, then choose Edit Movie under the Movie menu. You'll be presented with a full timeline video editing system where you can also add background audio and photos to your movie. Once satisfied with your movie, click the "Back to Menu" button at middle top to return to the DVD menu view.
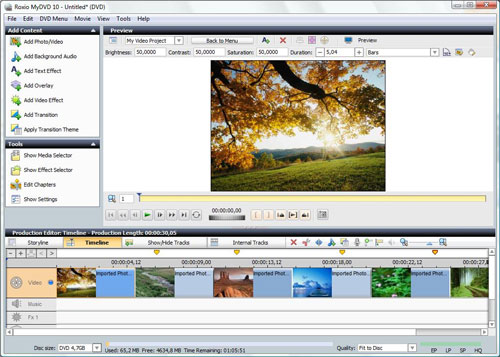
Editing a movie within MyDVD.
If you'd like to do more with your video clips, but don't want to take the time to edit them manually, MyDVD 10 Premier also includes CineMagic, Roxio's 3-step movie creator. Just select clips and stills, add a music track, and choose one of the eye-catching built-in styles. CineMagic does the rest!
Finishing Your Disc
At this point, you have imported all your clips, made chapters out of them, and edited them where desired. You've also made graphic design choices for your DVD menu. It's time to preview your finished movie to see if it runs the way you want it to. Click the Preview button at top right, and wait while it loads (it may take a few minutes, depending on the complexity of your disc). Finally, check the appearance, playback and navigation of your disc using the onscreen controls. You can easily go back and tweak the graphics or video if you find problems.
Now you're ready to burn! Simply click the Burn button at top right, and choose your target drive. You can also create a Disc Image file on your hard disk if you like, which can be burned later or uploaded to a Web site for others to download and burn.
Making a Slideshow
While we've covered the basics, MyDVD has lots more cool features to explore. For example, you can add an Intro movie that will play when the disc is inserted, before the main menu appear. (Like the FCC warnings and movie trailers that appear on commercial DVDs.) You can also customize the audio file that will play when the main menu is onscreen. But our favorite trick is using the Add Slideshow button to open the Slideshow Assistant, which leads you through the process of making a photo slideshow, then drops it right into a chapter on your DVD! This way you can combine home videos and photo shows on one disc. MyDVD 10 Premier even includes Roxio's full PhotoSuite editing package, so you can remove red-eye, rotate, crop and adjust your photos as needed.
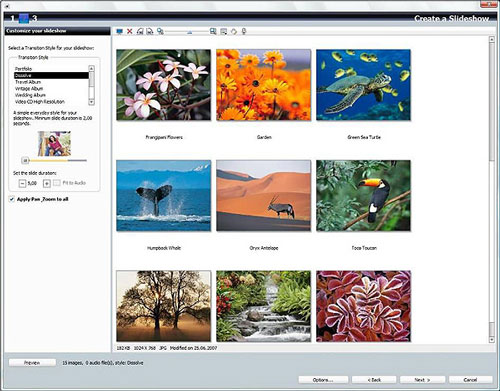
Creating a photo slideshow with the Slideshow Assistant.
Exporting Your Movies
MyDVD is not just about making DVDs. It's also the perfect tool to convert your movies for portable players or Web sites like YouTube. Roxio Copy & Convert lets you choose any of the clips you imported or edited for your MyDVD project, and then export them in the appropriate format for your player. You can even upload clips directly to YouTube at the click of a button, and sync movies with your iPod or other handheld player using the included Media Manager application.
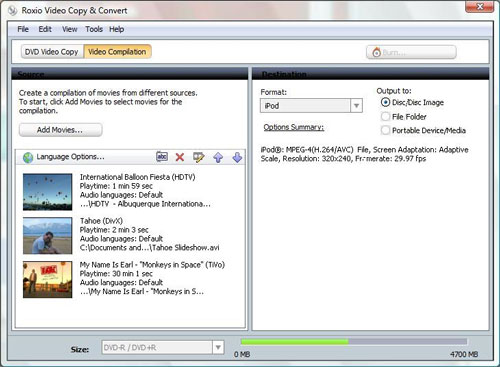
Exporting movies in iPod format.