Ever wished you could put the same videos on your iPhone or iPad that you have at home on your Mac, but there's not enough space? With the Roxio Streamer application in Toast 10, you can set up most any Mac to stream video over the Internet in H.264 format to a Mac or PC Web browser. There's even a free native iPhone app for viewing on your iPhone, iPad or iPod Touch!
With Streamer, you won't need to use up any of your precious mobile storage space, and you can have access to a much wider variety of shows and movies than you could ever fit on a portable player. Even better, you can stream any type of video that Toast can handle: your latest home movies, EyeTV recordings, and shows transferred from your networked TiVo DVR via TiVoToGo.
You'll need a high-speed Internet connection at both ends (such as Wi-Fi or 3G cellular), but once videos are added to the Streamer content list, they are available for remote viewing at any time. Non-H.264 video will automatically be converted by Toast. You can even have TiVo shows automatically transferred via TiVoToGo and added to the Streamer list as soon as they are recorded! You could pay big bucks for special streaming hardware to view your TV shows remotely, or you can get it all free with Toast!
Setting Up Streamer
The first time you use Streamer, you'll need to set it up with a user name and password. Assuming your router is UPnP or NAT-PMP enabled (as both the AirPort Extreme and Express are), it will be configured automatically. Otherwise take note of the TCP port number given under the Advanced heading and open that port on your router for the computer you intend to stream from.
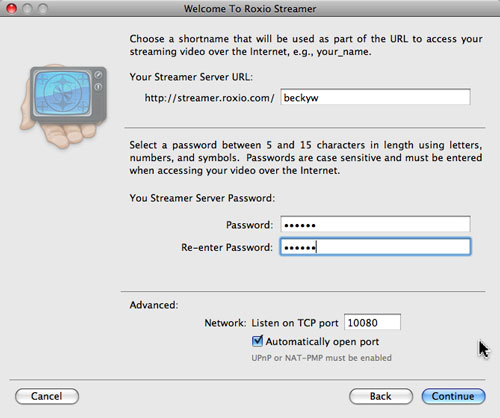
The Streamer setup screen.
Once you've created your account, the Streamer window will open. Choose Preferences under the Streamer menu to configure a few key settings, such as whether you want Streamer to launch every time you log in to your computer, and whether you'd like to start the Streamer server automatically on launch. If you want to be able to stream videos on demand to your iPhone, iPod Touch, iPad or laptop on the go, we recommend checking these two boxes so that Streamer is always at the ready. (You'll also need to leave your computer on, of course.)
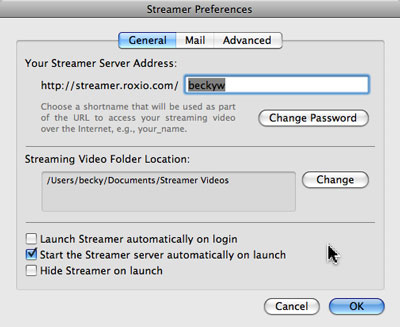
The Streamer Preferences window.
The Advanced tab under Preferences allows you to set the streaming video quality (which should depend on the upload speed of your connection -- higher speeds are capable of streaming higher quality video). The maximum data rates allowed are: Low (about 330Kbps), Medium (about 550Kbps), and High (about 760Kbps) quality. Trying to send a high data rate stream over a low rate connection will result in broken up or failed streaming, so be sure to test and adjust your stream as necessary. Choose low or medium quality for viewing over iPhone 3G connections. High quality is usually fine for Wi-Fi connections. Also note the Mail preferences tab, which lets you set an email address to be notified automatically when new videos are added to your Streamer list.

Streamer Advanced Preferences.
Adding Videos to Streamer
Now that you have Streamer all set up, it's time to add videos to your streaming list. There are two ways to do this. The first way is add them directly to Streamer by dragging and dropping files to the Streamer window or clicking the Add Video button to select them. You can do this for QuickTime files with a QuickTime extension (such as .mov), as well as EyeTV and TiVo files. If any conversion is needed (to adjust the data rate, for example), it will be handled automatically by Toast. For other video formats, such as DV and AVCHD camcorder files, you'll need to drag them into Toast first, then use the Convert project tab to send them to Streamer (simply choose Streamer as the playback format at bottom left of the Toast window).
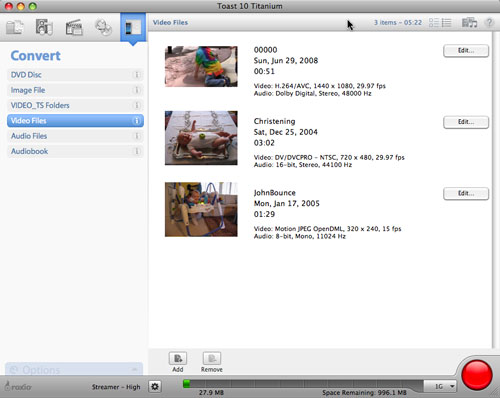
Converting video files in Toast to send to Streamer.
Once the files have been converted, they will appear in your Streamer list. You can click on any video to play a preview, if desired.
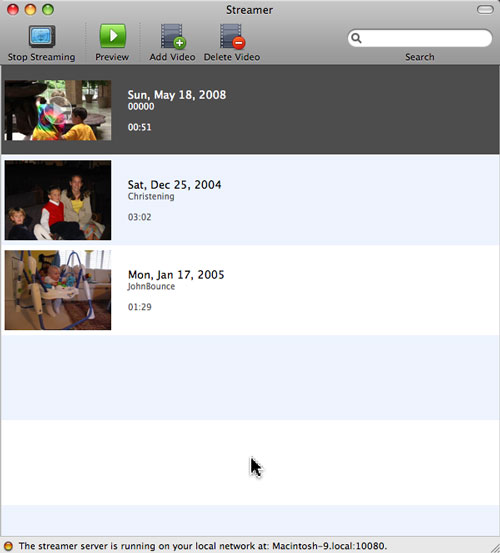
The Streamer list shows the files available for streaming.
Next, click the button to "Start streaming" if not already started. You will see a green light at the bottom of the window when the server is running, and the URL to use to access your videos remotely. Make note of this URL, which is of the form: http://streamer.roxio.com/username
Playing Back Streamer Clips
Now that the prep work is done, it's time to play back your videos! From your Mac or PC, enter the Streamer URL in your Web browser. (Be sure you are using a Wi-Fi or other fast Internet connection.) You'll get a login page that asks for the password you entered when you created your account. After entering the password, you'll see the Streamer list.
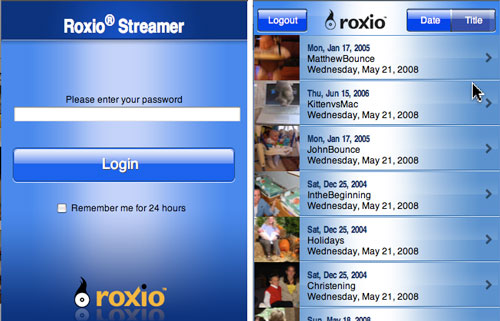
Logging into Streamer from a remote browser.
Choose a video, then click to play it back. The video will open using the QuickTime player. (Be sure to install QuickTime on your Windows PC, if you haven't already. If you have iTunes on your PC, you also have QuickTime.)
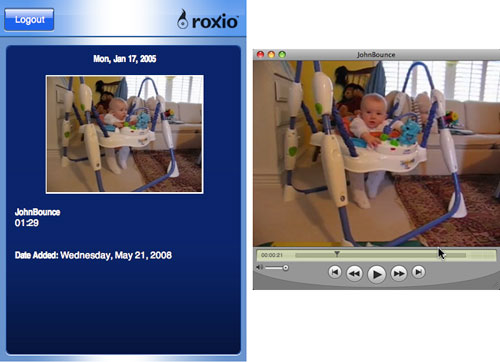
Playing Streamer videos.
On your iPhone, iPad or iPod Touch playback is even easier, thanks to the free native Streamer app for Wi-Fi. After you've downloaded and installed the app, on first launch it will ask for your user ID and password. From then on you can simply launch the app from the Home screen, and you will be automatically logged in and taken directly to your Streamer list. (Note that if you only have a 3G connection, rather than Wi-Fi, you can use the Web URL streaming method above in Safari instead of the Streamer app. EDGE connections are too slow for Streamer.)
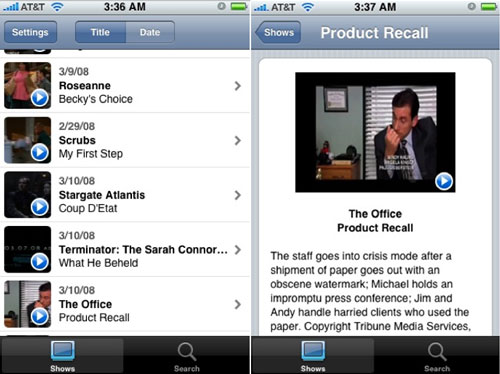
The Streamer iPhone app.
To browse available shows, simply use your finger to scroll down the list. Buttons at the top of the screen let you switch between viewing by title and date. You can also tap on Search and have search results presented as you enter characters. Multiple episodes of the same show will be grouped automatically into a virtual folder, reducing clutter. Tapping a folder name brings up a list of all the episodes inside.
Once you've found the show you want to watch, tap on it and you'll be shown a synopsis of the episode. Finally, click the play button located at bottom right and your video should begin playing in a few seconds. While your video is being played, you can review the show synopsis by tapping the screen.
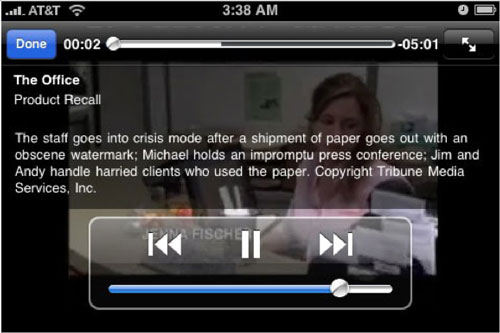
Playing Streamer videos on the iPhone.
Setting Up Automatic Transfers of TiVo Shows
That's all there is to it! Once you have Streamer set up, it's easy to add more videos. If you have a TiVo and use TiVoToGo, also take advantage of the ability to automatically send new recordings to Streamer. First, open TiVo Transfer (in the Toast Extras menu). Then select a television show that appears on your DVR and click the "Create Auto Transfer" button at bottom right. This will automatically transfer all new recordings of the selected show to your Mac.
Next, Open the TiVo Transfer Preferences and enable "Automatically export transferred TiVo recordings to Toast." Finally, open Toast Preferences and select the Audio & Video tab. At the bottom of this tab you will see an option called "Default for Automatic TiVo Exports." Click on the Change button and select Streamer, then click OK. All your automatic TiVo transfers will now be exported to Streamer immediately for viewing anywhere in the world you have a fast Internet connection!