If you thought you needed a Blu-ray recorder in order to burn high-definition discs from your home movies, think again. Toast 10 Titanium, together with the High-Def/Blu-ray Disc Plug-in (included with Toast 10 Pro), can burn HD video directly to standard DVD media using your regular DVD recorder, complete with customizable menu themes and navigation screens! These special AVCHD discs can then be played back on your Sony PS3 or most set-top Blu-ray players, for viewing on your HDTV's big screen. Of course, if you do own a Blu-ray recorder, Toast 10 can burn to Blu-ray Discs as well.
If you've watched Blu-ray movies played on an HDTV, you know how breathtaking the quality can be. There is simply no comparison between the detail you get with full 1920-by-1080 HD video and standard 720-by-480 DVD resolution. And now that HD camcorders and DVRs are plentiful and affordable, more people are recording their home movies and TV shows in high-def. Even the new iPhone 4 can record 720p HD video (1280-by-720 pixels).
So how do you get your home HD recordings onto your TV screen? Blu-ray recorder prices are still quite high, at least $200 for an external drive. While prices will continue to drop, if you want to burn your HD movies NOW, the answer is as close as Toast and your DVD burner.
You can fit up to an hour of HD video on a dual-layer DVD, which is plenty for most home video productions. If you are lucky enough to own a Blu-ray recorder, you can also burn hours of video on a Blu-ray Disc. Even better, Toast lets you crop and trim your HD video, so you can edit out segments you don't want. The same thing goes for HD recordings you make using Elgato's EyeTV or your HD TiVo, so you can burn your favorite HD shows onto DVDs that will play back in your set-top Blu-ray player.
Getting Started -- Import Your Video
To create a high-definition DVD, first open Toast 10 (make sure you have the High-Def/Blu-ray Disc Plug-in installed) and select the Blu-ray Video project option under the Video tab. Now bring in your HD video clips. Open the Toast Media Browser, and select clips already on your hard drive, or use the AVCHD option to import movies directly from your attached AVCHD camcorder (which should be in computer connection mode). You can even choose TV recordings from your EyeTV and TiVo folders.
While Toast does not import directly from HDV camcorders, you can use HDV clips in your high-def projects as long as you import them to hard disk first, using your camera's utility software, then drag them to the Toast window. Everything will be converted to the proper format when you burn your disc. As you import or drag in video clips, your Project window will start to fill up and look like this:
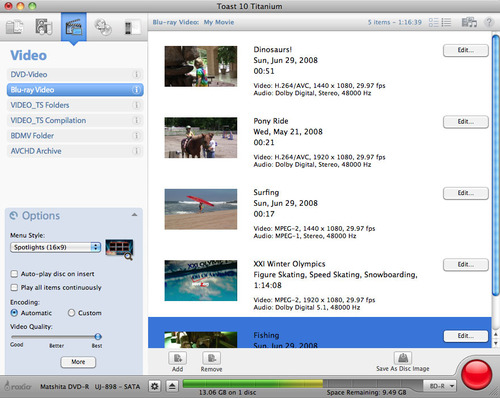
The Toast 10 Blu-ray Video project window, showing video clips in both AVCHD and HDV formats, and a TiVo recording (click to enlarge).
Each clip is labeled with valuable information, such as the date recorded, the length, and the encoding format (such as H.264/AVC 1920x1080 or 1440x1080 for AVCHD clips, and MPEG-2 1440x1080 for HDV camcorder clips).
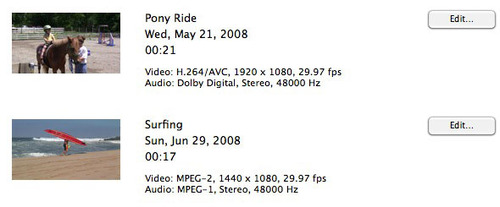
Video clips in the Toast Project window. The top clip is from an AVCHD camcorder, the bottom clip is from an HDV camcorder (click to enlarge).
Cropping and Trimming Clips
If some of your video clips need trimming to remove unwanted portions, click the Edit button next to each clip in the Project window. You'll see the following pop-up:
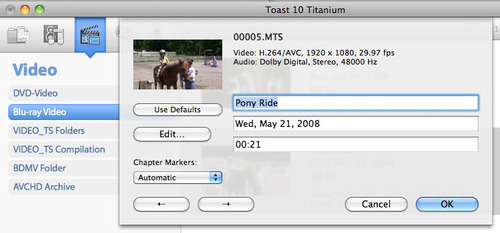
Editing a video clip in the Toast 10 Project window (click to enlarge).
Here, you can do several things. You can change the default name and date of your clip, and you can crop and trim it by clicking the Edit button. Change the name to whatever you'd like your clip to be labeled in the navigation menu you'll see when you pop the disc into your set-top Blu-ray player. Clicking the Edit button brings up the Toast Video Player window.
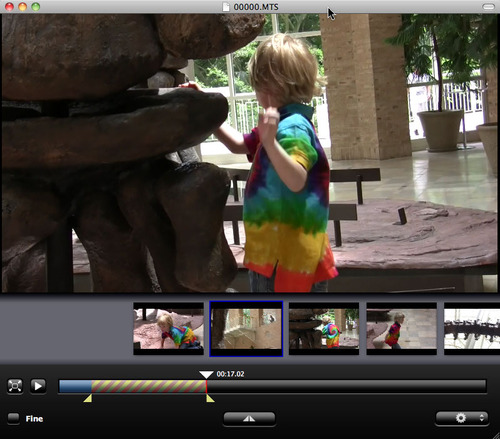
Trimming an HD video clip in the Toast 10 Video Player (click to enlarge).
To edit out unwanted portions of your clip first look at the slider below the video and move the pointer to the place where you'd like to start trimming. Click the middle icon just below the slider, which will then insert two markers at that point. Drag these to the left or right to exclude the unwanted portions. The area between the two markers will not appear in your finished project. You can repeat this procedure to crop out multiple portions. Finally, save your changes. Note that the original video will not be affected.
Finishing Your Disc
Now that you've imported all your clips, trimmed off any unwanted portions, and given them descriptive names, it's time to finish up your disc. Make sure the clips are in the sequence you'd like them displayed on your disc menu--just drag them up or down to change the order. Next, click the More button at bottom left to bring up the complete set of disc options. You can select a menu style (be sure to choose an HD style), decide whether you want the disc to start playing video automatically on insertion, and choose an encoding quality, among other options. "Best" quality encoding takes longer, but is worth it if you have the time.
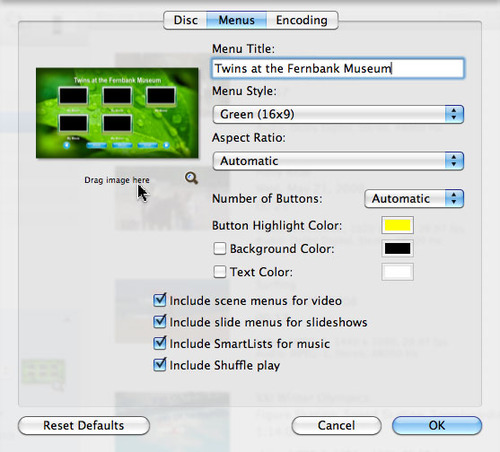
Setting disc recording options (click to enlarge).
Now you're all done, except for burning! The bar at the bottom will show how much video you have, and whether it fits on your disc. Choose DVD or DVD DL as the disc type if you have a DVD drive, and BD or BD DL if you have a Blu-ray recorder.

Choosing the DVD or BD disc type (click to enlarge).
If all is in order, click the red Burn button, insert a blank disc, and wait while Toast performs its magic. You can then pop your disc into most set-top Blu-ray players and enjoy high-def home movies on your HDTV!