Got a long road trip or plane flight coming up? Want to keep the kids happy and occupied? Put their (and your!) favorite TV shows and movies on your iPad, iPhone, PSP, or other media player (including in-car DVD players), using Toast 10’s handy Convert feature.
Toast makes it simple to convert non-protected DVDs, DVD Video_TS folders, home movie clips or downloaded videos to portable player and cell phone formats, including MPEG-4, H.264/AVC and DivX. You can even convert TV shows you’ve recorded with your El Gato EyeTV or copied from your networked TiVo, and send the results directly to iTunes or Roxio Streamer.
Getting Started
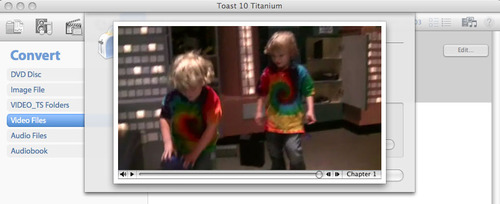
To start, open Toast and click the Convert tab, then choose from the list of source video types: DVD-video discs or image files; Video_TS folders; and individual video files on your hard disk, such as downloaded videos or TV recordings. Below, we've selected a Video_TS folder on our hard disk. Video_TS folders (which include all the content on a DVD) can be created by Toast from your home movie discs, or sometimes downloaded from the Web.
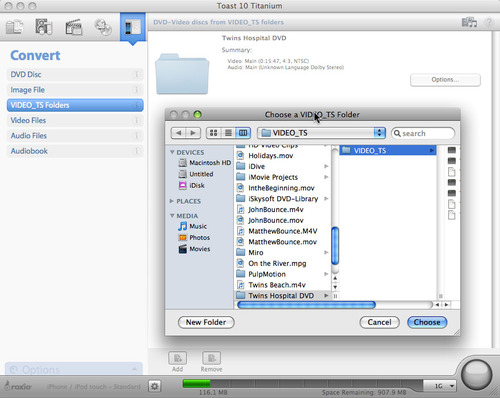
Converting a Video_TS folder (click to enlarge).
In addition to copying DVDs to your iPod or iPhone, Toast can convert and copy EyeTV and TiVo recordings -- or most any MPEG-4, QuickTime or DivX file. In the illustration below, we have selected a show from our EyeTV library within Toast's Media Browser.
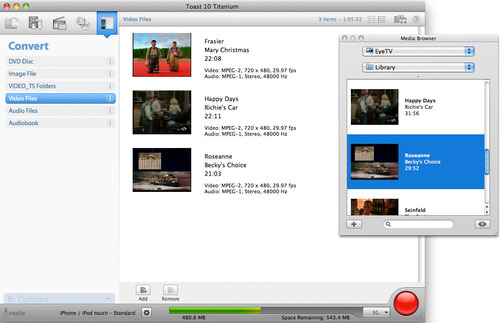
Converting EyeTV recordings.
Cropping and Trimming Your Videos
Before pressing the red Burn button to start the conversion process, it's time to clip out any unwanted portions of your videos, and check the encoding settings.
To trim out portions of your recordings, click the Edit button. Depending on the type of video you have, you will see two different edit windows, but the principle is the same for each: first move the slider below the video to the place where you'd like to start trimming. Click the middle icon just below the slider, which will then insert two markers at that point. Drag these to the left or right to exclude the unwanted portions. The area between the two markers will not appear in your finished project. You can repeat this procedure to crop out multiple portions. Finally, save your changes. Note that the original video will not be affected.
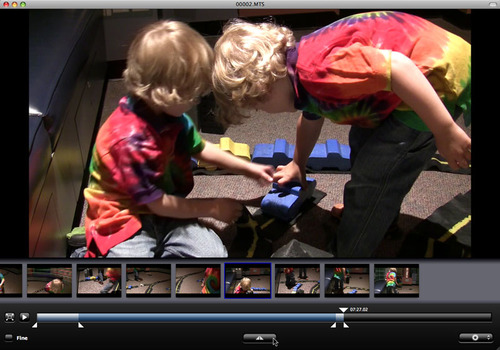
Trimming high-def video in Toast (click to enlarge).
Checking Encoding Settings
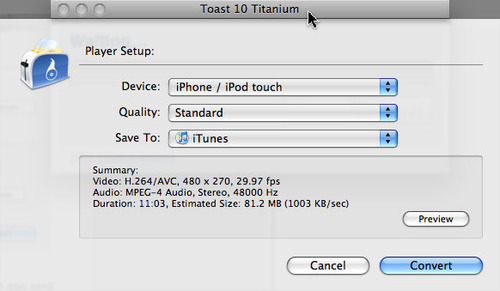
To check encoding settings, click the Player Setup button at the bottom left of the Toast window. (It looks like a gear.) A window will pop up that lets you select your output device format (such as iPhone or PSP), encoding quality level, and destination folder. Select your device from the list.
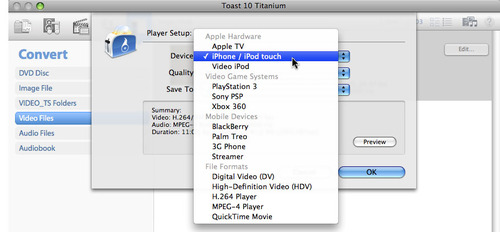
Choosing an output device.
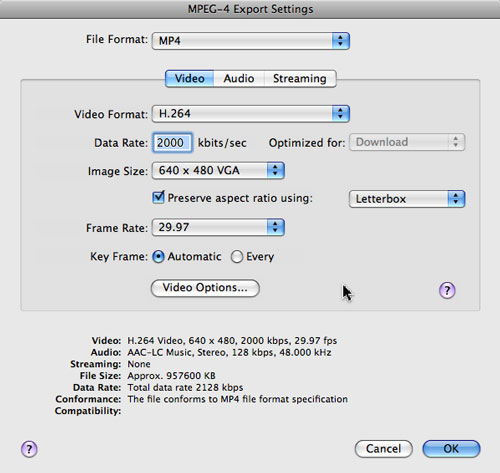
Next, if you are familiar with encoding settings, you can change the quality level to "Custom" and choose your conversion parameters. Here, we checked the box to preserve the aspect ratio using letterbox format, since we were combining HD and SD sources. It's best to leave the settings at their defaults unless you know what you are doing or want to experiment. For iPad, you can just use the Apple TV setting in Automatic mode.
Customizing encoding settings.
After tweaking your settings, try the Preview button to see a snippet of your video the way it will be encoded. This is really handy for avoiding problems, since encoding full-length videos can take hours, depending on the speed of your machine.
Previewing the results (click to enlarge).
Starting the Conversion Process
Assuming you like what you see in the Preview, it's time to convert your video! Press the red Burn button and the Player Setup window will pop up again. Double-check your settings, and press "Convert" to start the encoding process. You'll see a progress bar of the results telling you how much longer you need to wait.
The Player Setup window appears when you press the red Burn button (click to enlarge).
In addition to saving videos for copying to your portable player, Toast can also send videos direct to Streamer, Roxio's free real-time streaming service. With Streamer, you can view videos streamed from your home Mac in real time directly to your iPhone, iPod Touch or laptop. You'll need a broadband connection, such as WiFi or 3G cellular. For a complete tutorial on using Streamer, click here.
So next time you're hitting the road, don't leave home without your videos. Creator makes it easy to take them with you.