This holiday season, why not dig out those shoeboxes crammed with old photos, or folders stuffed with digital camera pics, and create a slide show full of memories that you can give to family and friends? Toast 8 Titanium offers two great (and easy!) ways to make photo shows in Video CD, Super Video CD (S-VCD) and DVD formats that you can play back on both set-top DVD players and computers.
Slide Shows, the Easy Way
For ultra-quick and simple photo discs, just click on the Video project button and drag pictures into the Toast window from the Media Browser or the Finder. You can import individual pictures, groups of pictures, or entire folders from anywhere on your hard disk, or from your iPhoto library. Arrange them in the order you'd like them displayed by dragging them up and down, choose whether you'd like to create a Video CD, S-VCD or DVD disc, and burn!
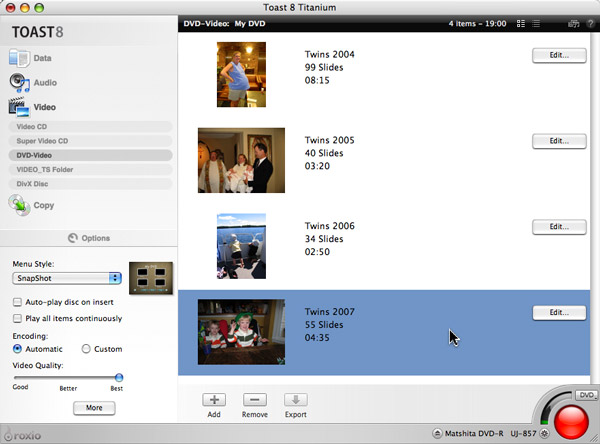
Making a DVD slideshow with Toast.
Note that when you drag a group of photos at one time, or a folder, it appears as a single slideshow item in the project window (up to 99 pictures per slideshow). Clicking on the Edit button then allows you to add, remove or rearrange photos within the slideshow, set the duration of each slide, and add a title for the slideshow. When you drag additional groups of photos, or individual photos, to the project window, they appear as additional separate slideshows underneath the first one. Each slideshow will have its own button and text title in the disc navigation menu when burned. This is a handy way to organize pictures on a disc. You could have separate slideshows for each child, holiday, event, year, etc.
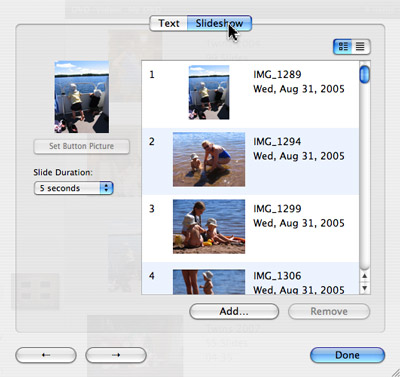
Clicking the Edit button for a group of photos brings up a dialog box where you can rearrange photos within the slideshow and set the duration for each.
The options at bottom left of the Toast window let you customize the disc a little. You can choose a menu style for your disc, as well as the desired quality level, and set the disc to automatically start playing when inserted into your player. Click the "More" button to bring up a few additional goodies, such as the ability to edit the menu titles for your disc, and the option to include the original full-quality photos along with your slideshow. This is a great feature for sharing photos with others. Not only will they be able to view your pictures on their TV screen with their DVD player, they can print them in full quality from their PC or Mac too!
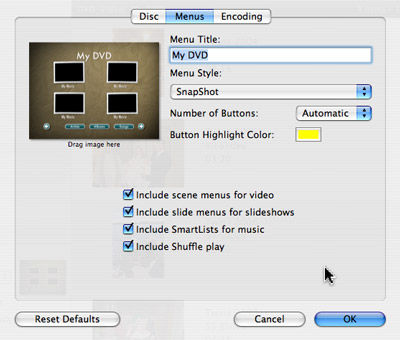
Toast video disc options include menu titles and auto-play upon insertion.
Using Motion Pictures HD
After making a couple slide shows using Toast's built-in video disc capabilities above, your appetite will likely be whetted for additional features, such as being able to add music and transition effects between pictures. That's where Motion Pictures HD shines. This standalone application, included in the Toast 8 suite, helps you create amazing slideshows, with pro-quality pans and zooms, audio soundtracks and much more. While you can use the default settings to make a Ken Burns-style photo-movie without so much as a peek at the Help file, here are some pointers that will help you get the most out of the program:
First, click the Media Browser button at top left to select photos for your slideshow. You can then reorder the pictures by dragging them up or down, or use the Slide Sorter view available from the Window menu. Handy left and right rotation buttons in the toolbar let you reorient photos if needed.
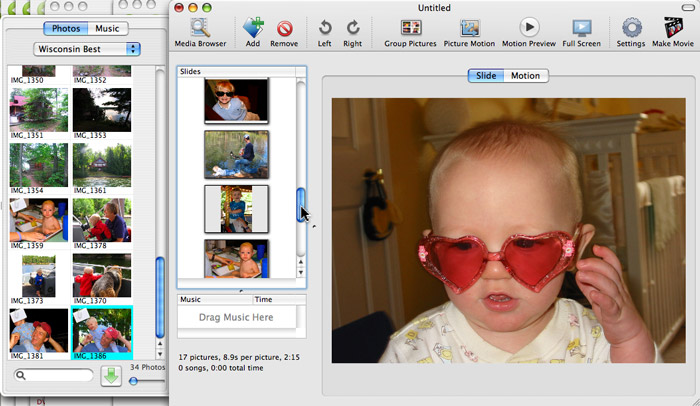
Use the Media Browser to bring in photos for your slideshow.
While default motion effects will be applied to each picture, you can change these by selecting any slide or group of slides and clicking the Picture Motion button in the toolbar. Available Picture Motions include zoom, pan, zoom and pan, horizontal or vertical pans, random motions, or no motion at all. Each motion has one or more parameters, such as percentage zoom and start and finish points that you can experiment with, and you can also select the exact areas of your image to use as the start and ending points of zooms. Use the Motion Preview button to see what your effect will look like. Play around with the various pans and zooms until you are familiar with them. They are great fun!
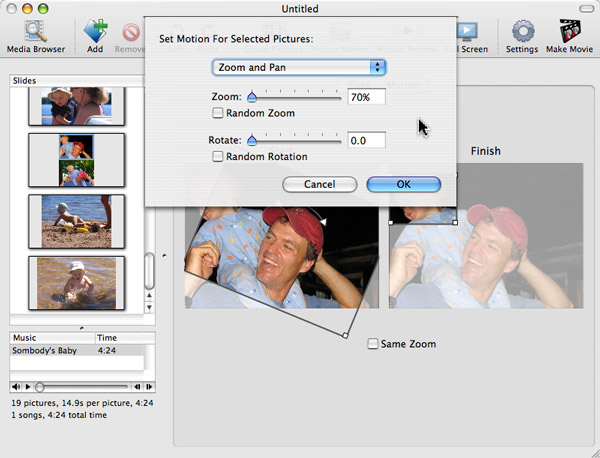
Choosing a Picture Motion for a slide.
If you don't have time to play, and just want to make a quick show, leave the motion presets in their default mode. Or choose make the Random mode in the Preferences dialog your default to create some hilarious effects!
Now that you've gotten your motions down, it's time to add a soundtrack for your slideshow. Click the Music in the Media Browser, and choose one or more audio files, depending on the length of your show. The Settings button at top right lets you fit the pictures to your music, or repeat the music if needed. Other options in the Settings dialog include the amount of time for transitions between slides, whether to use a widescreen 16:9 aspect ratio, and a title for your slideshow.
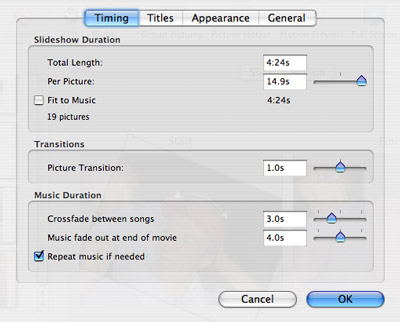
The Settings dialog lets you fit your slideshow to a music track.
Now you're ready to export your motion picture. Click on the Make Movie button to record your show to disk in any format from email, to Web video, to full-quality widescreen DV for use in iMovie or a Toast video disc. If you export to Toast, you can opt to send the original picture files along with the movie for burning to one video disc.
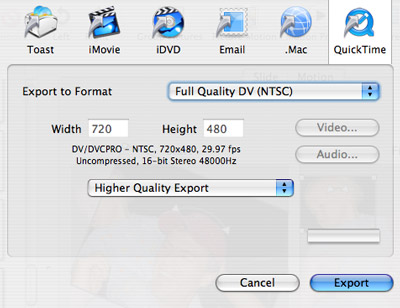
Motion Pictures HD slideshows can be saved in a variety of formats, from email to iMovie, and even .Mac.
Exporting will take a while, depending on the length and quality of your slideshow, and the speed of your processor. Assuming you opted to send your movie and original photos to Toast, you can then burn a Video CD, Super Video CD or DVD by clicking on the Video button as described at the beginning of this article. Choose "Add Original Photos" in the Disc Settings Drawer if you'd like to include them for people to see when they insert the disc into their Mac or PC. Then click the Burn button! You're all done creating your first Motion Picture.