Tired of scrawled titles on burned CDs and DVDs? Bring out your secret weapon in the war against the black magic marker: Roxio Creator 2012! Next time you make a party compilation disc, digital photo album, or DVD/Blu-ray of your kid's birthday party, try making a printed jewel case cover. It's simple with the included Label Creator program. You can print three ways: to label templates from most major manufacturers, such as Avery and Neato; to printable discs with an appropriate printer; or even directly to disc using a LightScribe drive.
We recommend the latter two printing methods for discs, since stick-on labels can sometimes get stuck in slot-loading drives like those in many cars and most Apple Macs. LightScribe is a technology that etches labels right onto the reverse side of specially made discs, using the laser in your recorder. They have a cool holographic look, and come in several colors. Printers with direct CD/DVD print support are available from Canon, Epson and HP, among others, and LightScribe drives from companies like HP, Samsung, and Toshiba. For both LightScribe and direct disc printing, you'll need to buy special recordable media. Look for discs labeled "LightScribe" or "printable."
Taking the Express-Way
There are two basic ways to use Label Creator. For quickest results, use the Express Labeler wizard, which is invoked whenever you launch Label Creator from within another Roxio application. It's also available from the Tools menu within Label Creator. Express Labeler provides a series of dialogs that quickly step you through the process of creating labels, booklets, inserts and more. You can have finished labels in just a few clicks, using the convenient styles and automatic track name import. We won't go into the details here, since they are largely self-evident. Instead, we'll show you how to get creative by customizing your labels and inserts.
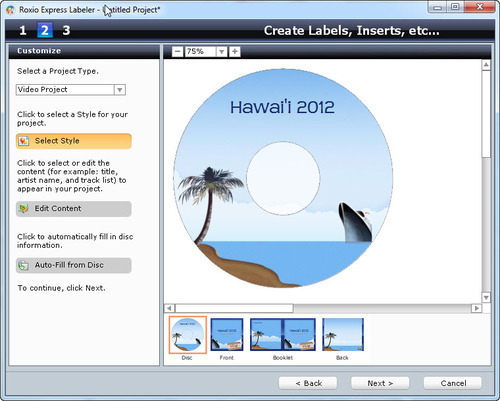
Taking the fast lane to disc labels with Express Labeler.
To launch Label Creator in full mode, choose it directly from the Windows Start menu in the Roxio Creator Applications folder, or by clicking the "Edit in Label Creator" button at the end of the Express Labeler wizard (this method lets you start a label quickly in the wizard, and then use Label Creator to add custom elements). At startup you will be presented with a generic template for the disc label. Other layout options include: front and back jewel case inserts, booklets, slim case inserts, mini disc labels, core labels, disc sleeves, and DVD case inserts and booklets. To get started, choose all the layouts that apply to your project, such as label, booklet and back insert for an audio CD. The linked layouts will then appear in the window, and you can move back and forth between them.
All the templates are sized to fit perfectly into standard plastic jewel boxes, so all you need to do is add artwork and information. And Label Creator helps you there, as well. The easiest way to add glamour in Label Creator is to choose from one of the many different pre-designed templates, or Styles. Styles are professional graphics backgrounds combined with strategically placed text fields. Simply choosing a Style (by clicking on the Select Style button at the left of the screen) and filling in relevant information creates a handsome jewel case package. A Style can be applied to all the parts of your project for a consistent look, or just a particular layout. (Don't worry, you can also create custom designs, which we'll get to later.)
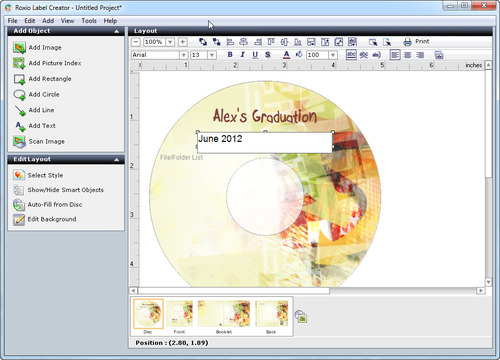
Customizing a disc label with Label Creator (click to enlarge).
Once you've selected a design theme, it's time to enter information about your project into the text fields. For data CDs, that information will likely be title, contents, and date created. For Audio CDs it might also include the artist name and song list. If you've entered any of that information already while burning your CD-R in Creator, Label Creator can read it off the disc and position it for you in the label using the Smart Objects feature (click the Smart Objects button at left to select the elements you want on your label). Hitting the "Auto-Fill from Disc" button then polls your disc drive and returns with title, contents, artist, and other information and places it in the appropriate fields. Audio CD info will be automatically looked up on the Web for you. For any remaining fields not filled in, you can just double-click the text boxes and enter data manually. By using Styles and the information available on a disc, making a handsome jewel case cover and label can be faster than putting on earrings.
Adding Your Own Graphic Elements
Of course, you don't have to use the Styles as they are. You can use a Style as a starting point, then add or delete graphic elements, and change, reposition, or add text fields. The "Add Objects" tools let you add photos or graphics, rectangles, circles, lines and text, making Styles completely flexible. Label Creator doesn't mind if you overlap multiple fields, and lets you send objects to the back, bring them to the front, and align them in various ways by using the positioning tools at the top.
You can also apply special effects like curved text, shadows and rotation to text. To experiment, select the field or fields you want to edit, then choose Properties from the Edit menu. You'll get a dialog box with a preview field. Selecting multiple text fields at once and editing Properties or using the text toolbar at the top of the layout window is also an easy way to apply the same style across multiple text boxes.
To add your own custom image as a background, click the "Edit Background" button at bottom left. This lets you select a picture or graphic file, or a solid color, then apply it to some or all of your layout templates. Label Creator automatically resizes image and photo files to fit the template, which can save a lot of work. Or, instead of making a photo the background, use the Add Image tool at left to import it on top of the background. You can then scale the image to any size and thus effectively replace the background.
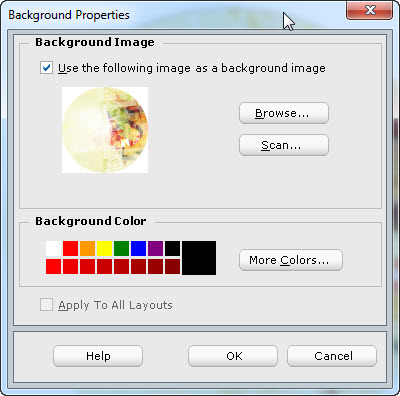
Choosing a background image or color in Label Creator.
If you're making a photo album or DVD, you should have plenty of photos or video stills to choose from for your cover art. For audio CDs, try the Web: it's full of pictures of celebrities, singers, and bands, including CD cover art. Right-clicking on just about any image on the Web lets you save it to your hard drive, typically as a JPEG file which can go straight into Label Creator. What's more, you can find lyrics to a large majority of popular songs on the Web, often at an artist's own Web site, which you can cut and paste into your jewel book. Just be aware that these images and lyrics might be copyrighted, and should not be downloaded for anything other than personal use within the copyright laws.
If your cover art is not available on the Web, you can also scan the original album cover directly into Label Creator, with any standard scanner and the Scan Image tool at left. Or try scanning old family photos for a picture CD.
Printing Options
Once you've got your labels and cover art designed, it's time to print! Any color inkjet printer and photo paper will do, but for best results and perfectly cut covers, try the special labels and papers made for the task (available at any office supply outlet). Label Creator already has most popular brands listed in the Print dialog. To ensure exact page placement, test things first on some plain paper, then use the Calibrate button to fine-tune the alignment. Once you've gotten the placement perfect, you can create future labels and covers over and over with the same template and positioning.
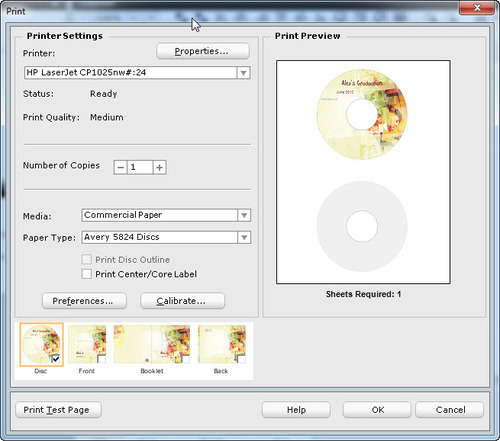
Label Creator's print dialog is where you choose options like specialty label types, or even LightScribe laser-etched labeling (click to enlarge).
For disc labels, Label Creator also supports printers that can print directly onto CDs. For these printers, you can choose printable silver, white or other media. Just look for the word "printable" in the media name.
If you're using stick-on labels, be sure to position them precisely over the middle hole, and then squeeze any air bubbles out by pressing from the center outward. Blank silver CDs without any logo printing work best, printed lettering may show through your labels, or create unsightly ridges.
That's all there is to it. So next time you make a CD, there's no excuse for using magic markers! Your CD rack, your friends, and your customers deserve better. Making yourself look like an artist doesn't require any crown jewels, just well-designed ones.