If you're getting ready to record your holiday celebrations with a new 3D camera or camcorder, or simply want to shoot side-by-side 3D photos with the 2D camera you already have, these tips will help you get the best possible pictures.
First, check out our guide to shooting holiday video, which apply whether you're shooting in 2D or 3D. You'll discover tricks like getting down to kid level and using time-lapse video.
Check out our guide to shooting holiday video.
Next, if you have a pair of red/cyan glasses, either paper or plastic, don them now to see the anaglyph 3D pictures in the rest of this article. (Don't worry, you can still understand and use the tips without the glasses.)
Tips for 3D Photo & Video Shooting
Plan your depth cues — The appearance of 3D is produced when multiple objects in an image or movie are located varying distances from the camera. These provide "depth cues" that help your brain perceive the scene in 3D. In this photo of the Washington Monument, water is the only foreground depth cue, so the appearance of 3D is muted.
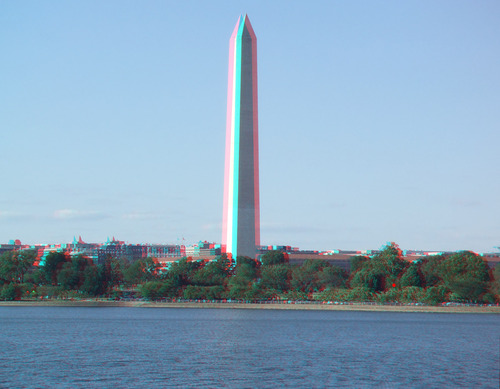
With water as the only foreground depth cue, the appearance of 3D is muted in this photo (click image to enlarge).
Compare that effect to solemn scene from the Korean War Veterans Memorial, below, where the bushes, fence, sidewalk, wall and trees in the background all provide depth cues that create a powerful 3D effect.
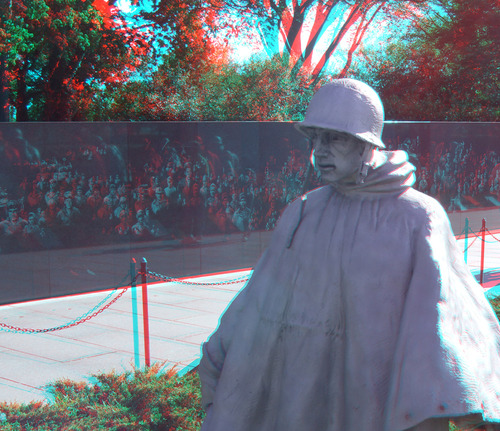
Here the 3D effect is powerful due to the variations in depth (click image to enlarge).
Compose your shots so that your depth cues are well spaced between the closest foreground and farthest background objects. If you're shooting the Grand Canyon, a bush a foot away from the camera is a blurry distraction. If shooting a close-up of a flower, objects a foot in front of and behind the flower enhance the 3D effect.
Mind the screen borders — 3D is an illusion, and you should avoid clues that ruin this illusion. In this statue of John Paul Jones, the 3D effect is powerful at the top of the image, but muted where the background and statue meet at the bottom edge of the photo, which tells your brain that the statue, background and edge are all at the same depth.
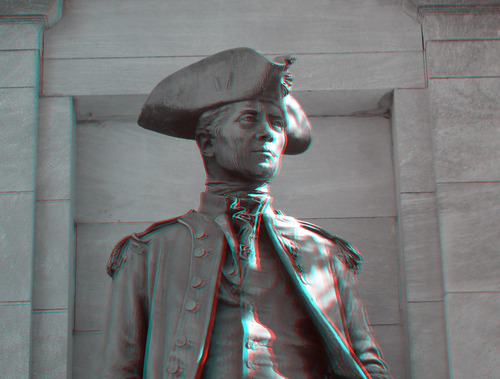
Be mindful of the borders of your image when shooting 3D (click image to enlarge).
Plan your shots so that the critical 3D-related components don't touch the borders. In the John Paul Jones shot, this would mean framing more loosely, so a larger portion of the body appears in 3D. In a video shoot, this means that all critical action occurs within the frame, and doesn't touch or extend beyond the borders.
Don't blur the background — When shooting traditional photos and videos, a popular technique is to blur the background, which focuses the viewer's attention on the subject of the shot. With 3D, you need the background objects to be as clear as possible to provide depth cues to the viewer. This means setting aperture at the highest possible value, creating the widest possible depth of field.
Make sure you have plenty of light — Most 3D viewing systems - whether $2.00 anaglyph red/cyan glasses, or $200 active shutter glasses -- darken the 3D photo or movie to some degree. This means that you should shoot your 3D shots with plenty of light. If you're following tip 3 (don't blur the background), you're also shooting with a high aperture setting, which reduces the light that reaches the lens. You'll get the best results shooting outdoors on sunny days, and if you shoot indoors, add as much light as you can to the scene before shooting.
Minimize grain — Simulated film grain reduces the sharpness of shot, and can reduce the associated 3D affect. Shoot at the lowest possible ISO setting.
Learning your camera's manual controls — You've probably already realized this, but tips 3, 4 and 5 probably mean that you'll have to abandon auto mode on your camera or camcorder and learn how to configure your camera manually.
When producing for anaglyph (red/cyan) distribution, mind the colors. Red/Cyan anaglyph viewing isn't friendly to reddish colors, converting them to yellows or blacks. You can see this in the image below; the original orange color turned to mauve by the anaglyph process.
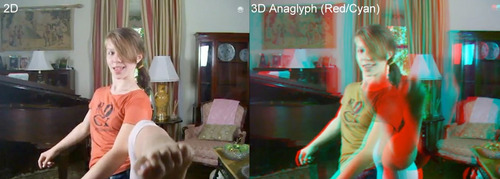
Here's a before and after, a 2D image converted to anaglyph 3D, with accompanying color change (click image to enlarge).
If you can control what your subjects are wearing, stay away from reds, oranges and similar colors, favoring grays and blues. For serious shoots, however, you should check your colors out beforehand to make sure they look good in anaglyph. If you're out shooting casually, keep in mind that anaglyph red/cyan may not be the best technique to capture the beauty of a red rose.
Shoot in the target viewing orientation — Few 3D editing programs let you rotate your images. Though there may be workarounds, depth cues and the associated 3D effect seems most effective when viewed at the original orientation. So don't shoot in portrait mode if you plan to rotate into landscape, or vice versa.
The world is your oyster — When shooting 3D images with a 2D camera, you're stuck with subjects that don't move. With a 3D camera, you can shoot any subject, moving or otherwise.
Experiment with alternative shooting settings — We've already discussed that you'll have to learn how to set aperture, exposure and ISO settings manually to produce the best results with your 2D camera, and the same obviously holds true with 3D cameras.
If you have a 3D camera, keep in mind that your camera may have alternative shooting modes that enhance its 3D capabilities. For example, the Fujifilm FinePix REAL 3D W1 camcorder has an Individual 3D Shutter mode that lets you combine two shots from a different angle into a single 3D image, which is useful when creating 3D images from longer distance shots. In this mode, the camera displays the first image in the viewfinder while you're framing the second, which obviously assists the precision of the framing. So beyond learning how to go manual with exposure and ISO related adjustments, explore any alternative shooting settings.
Shooting & Editing 3D Movies
Limit DOF, maximize light, disable — All of the rules for shooting 3D photos apply when shooting 3D videos, whether with a 3D video camera or with a 2D camera that you intend to convert to 3D in Roxio VideoWave. In particular, keep in mind that video cameras need much more light than still image cameras, and light accordingly. If your video is dark and grainy, it will be almost impossible to perceive any 3D effect.
Frame more loosely to maintain good screen borders — Video can produce very powerful 3D effects, but they're almost totally muted if the subject in motion intersects with a screen border. Frame loosely to avoid this contact.
3D takes time so pace your videos more slowly — It takes a few moments for the brain to perceive 3D, so fast paced cutting from one 3D scene to another will limit the perception of 3D. Slow down pans and other camera motion as well.
Be conservative when editing — When editing your videos, keep these thoughts in mind:
• Limit the use of effects. Any effect that blurs edges in a video, like blurring or film grain, or otherwise distorts the content, like ripple or relief, may lessen the perception of depth in the 3D video.
• Be careful with color correction. Color adjustments on video to be distributed in anaglyph format may interfere with the Red/Cyan coloring used to produce this output.
• Be conservative. In general, be conservative in your first few 3D projects until you learn how to maximize your 3D videos. Then start spreading your creative wings.
Most of all, experiment and enjoy! 3D is an adventure. Don't be afraid to experiment and try new things. If you're a PC user, also check out our additional tips for editing 3D photos and videos with Creator 2011 here.