Need a soundtrack for a family vacation or road trip? Unlock your family's musical past by converting old LPs and tapes to digital, then create mix discs or iTunes playlists customized for everyone on your list. All you need is Toast 11 and a turntable or tape player. So dig up your old record player, or borrow one from a friend. The process is quick and painless.
Toast 11 makes it easy to get great results with its Spin Doctor app. Even better, once you've made your recording, you can put away those LPs, preventing further wear and tear, and preserving them for future generations. You can also go on to make CD and DVD compilations of your musical memories -- perfect for family reunions, anniversaries and birthdays -- even combining them with tracks from digital sources like CDs or Internet radio (which Toast 11 can automatically capture from your Web browser!). This article shows you how, step by step.
Step 1: Use a Clean Source
When digitizing an analog audio signal it's important to make sure you get the best signal into the computer before recording. While Toast's Spin Doctor has clean-up filters, they should be viewed as secondary. Make sure that you wipe your LPs (with a soft, lint-free cloth or record brush). If you have a lot of material to record, you might also consider replacing the needle in your turntable if you can't remember the last time you did so. Similarly, make sure your cassette deck heads are clean, and that you engage the same noise-reduction technology (Dolby B or C, etc) used when the tape was recorded. Not all decks support all technologies.
Step 2: Connect Things Up
Depending upon whether you have a record or cassette, you will have to use a slightly different technique to connect your sound source to your computer. For tapes and other line-level audio sources, including TVs, VCRs, DVD players, stereo receivers, and MP3 players, you should ideally use a player that has line-out jacks (usually two RCA plugs), and connect these jacks to the line-in minijack of your Mac. (If your Mac doesn't have an audio input jack, you will need to buy a third-party USB audio interface.) If your portable tape player lacks line-out jacks, you can also use a headphone output; though this will require more work in adjusting levels (see Step 3).
If you're recording from an LP, you'll likely need to run it through a receiver or amplifier with a "phono preamp" first because most turntables put out a signal that is much lower than a standard line signal. Connecting this directly to the computer will not work properly. Many home receivers and amplifiers have a special input for connecting the turntable. You then connect the line-out from the amplifier (often labeled tape out) to the line-in of your Mac. If you don't have a receiver with a phono input, you can buy dedicated phono pre-amps at electronics hobby stores. Finally, there are USB turntables that provide a direct USB input to your Mac. These are the easiest to connect.
Step 3: Choose Recording Input and Adjust Levels
Now you're ready to begin recording! Open Spin Doctor and select a recording source -- most likely the Built-in Input if you are recording from the Line-in, or a USB input. If things are hooked up correctly, you'll see the input level meter light up, and you can also monitor the source using speakers or headphones by click the speaker icon at right.
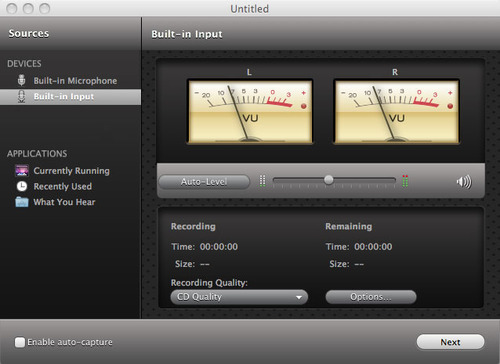
Choosing your input source (click to enlarge).
Next, adjust the audio input level, or gain. Setting the correct input volume is very important. When recording, you want to get as high a level as possible without "clipping." If this happens, the audio may be noticeably distorted. To adjust the level, watch the two meters in the recording window as you are playing the loudest passage in your source. Adjust the level slider so that the bars stay just just below the red region (where clipping occurs) even in the loudest areas. Note that if you have used the headphone connection of a tape recorder or amplifier as your source, you can also adjust the volume on your tape deck or amp. For best results in this case, the output from the source and the Spin Doctor input slider should both be set about halfway. (If you are using a USB input, the gain slider will be fixed and you can skip to the next step.)
While you're checking levels (using quality headphones or external speakers if possible), also check for hum -- you may need to ground your source deck. Most turntables come with a special ground wire for this purpose. Also make sure that the computer and source equipment are plugged into the same power strip, and that power cables and sound cables are not bunched together. Keep sound cables away from CRTs, televisions and other sources of electronic noise.
Once you've adjusted the input level, choose the recording quality from the drop-down menu at the bottom of the window, such as CD, DVD, or DVD High Quality. Choose as appropriate depending on what type of disc you want to make, and click Next.
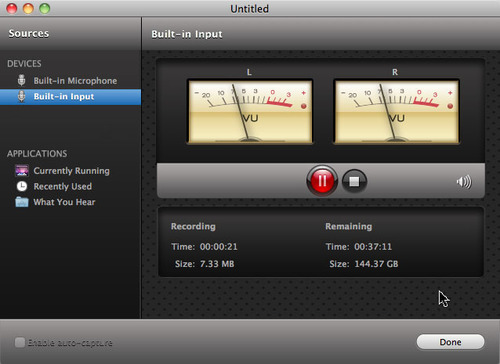
Making the recording (click to enlarge).
Finally, it's time to press the record button! Cue up your source to the beginning, press the record button in Spin Doctor, and then start your source. Don't worry about recording blank space at the beginning; you can remove that later. Make sure you have enough disk space before starting. CD audio is uncompressed, and runs about 10MB per minute (or 600MB per hour). Spin Doctor cleverly tells you exactly how much recording time remains. Click the Pause button if you need to pause the recording, and click the Done button when you are completely finished.
Step 4: Identify Tracks and Clean Things Up
Once you've made your recording, it will appear as a single waveform in Spin Doctor, where you can edit it and apply filters like noise reduction. If you have recorded an entire LP or tape with multiple tracks, the first thing to do is divide up the tracks. Spin Doctor can do this for you automatically. Simply click the Auto-define Tracks button at the top. This will define tracks based on passages of silence in the recording. You can set the sensitivity and other parameters in the Spin Doctor Preferences dialog. You can also set Spin Doctor to automatically define tracks after every recording.
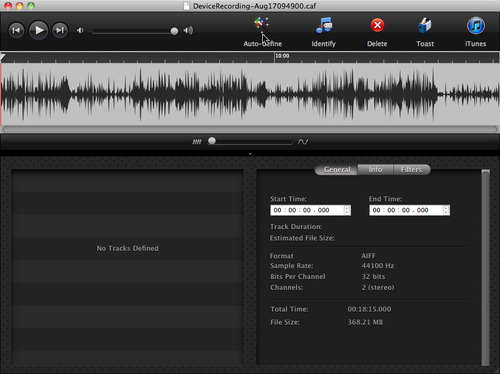
The Spin Doctor recording before defining tracks (click to enlarge).
Next, click the Identify button at the top to automatically retrieve artist and track names from the GraceNote online database. It works amazingly well. We were only able to stump the database a few times. The Info button at lower right lets you view and edit track data such as artist names and song titles.
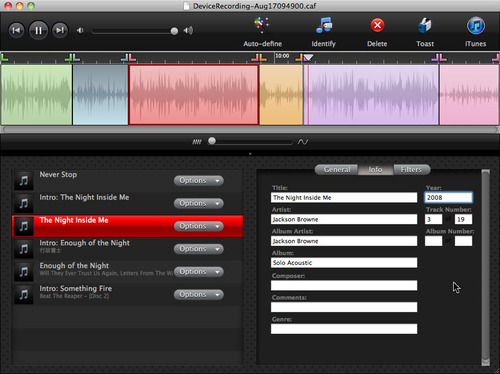
After defining and identifying tracks (click to enlarge).
Finally, click the Filters button at lower right. Here, you'll find noise reduction, sound enhancement and EQ filters that you can apply to your entire file, or selected tracks. Keep Noise Reducer settings as low as possible to reduce noise without muting the overall sound too much. It's often useful to test noise reduction settings on a quiet passage (such as the spaces between songs) where noise is easily distinguished.
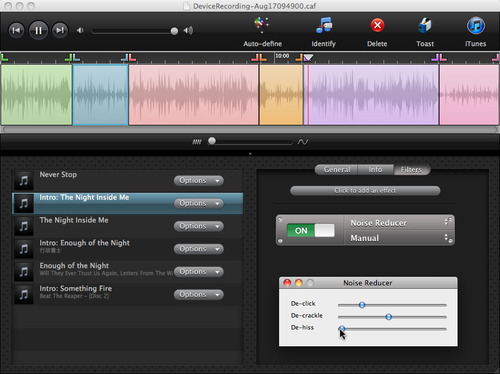
Applying noise filters (click to enlarge).
The Sound Enhancer filters let you adjust the dynamics of a recording. This is particularly useful for restoring some dynamic range to tape recordings as well as MP3s created with low bit rates. Why is this necessary? Compression (as with MP3 encoding) tends to make highs not as high and lows not as low. Similarly, tapes often don't have the dynamic range found in records and CDs due to a lower signal-to-noise ratio. The Sound Enhancer manipulates the signal to expand the differences again (you can think of it like increasing contrast in a photographic image).
Step 5: More on Defining Tracks
Spin Doctor's Auto-define Tracks feature analyzes the recording, looking for quiet passages, and splits tracks automatically. If it doesn't match the original tracks correctly, you can manually define the tracks clicking on the waveform where you want the track to begin, dragging to the right, and then releasing the mouse button where you want the track to end. Your newly created track is displayed on the timeline as a colored rectangle and appears in the track list at lower left. This method is also useful for snipping off unwanted portions at the beginning or end of your tracks. Note that the entire selection must be outside of any existing tracks.
Note that by selecting only the regions with sound when you define tracks, you eliminate any silence at the beginning as well as the gaps between songs. The gaps will be added back when you burn your audio CD. Toast automatically puts in 2-second pauses, but you can customize them.
Step 6: Burn or Export Your Recordings
Once you have defined your tracks, simply select the ones you want to transfer and press the Toast or iTunes button at top right. Toast or iTunes will be launched and the track(s) you selected added to the Toast Audio CD project list or your iTunes library. In Toast, you can then adjust the gaps between tracks and complete your CD setup before burning. You can also drag tracks from Spin Doctor to Toast, and combine them with digital tracks from other sources.
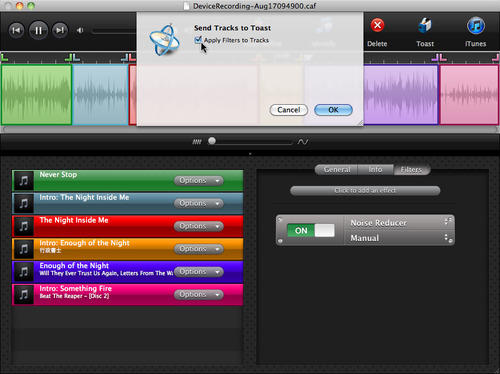
Sending tracks to Toast (click to enlarge).
When combining tracks from multiple sources, try the Normalize Track function found in the Toast Disc menu. Normalizing all tracks on a CD helps equalize the volume of tracks taken from different sources, which can be annoyingly loud or soft. (However, normalization should not be used as a substitute for setting levels correctly during recording. Once a sound is distorted or clipped, you can't restore it.)
Now it's time to press the Burn button! You've just made the best possible recording of your LPs and tapes. Don't forget to transfer that beautiful album cover art to your new CD too. Toast 11 Titanium includes Disc Cover 3 RE, which makes it easy to create perfect labels and covers.