With Popcorn® 4 you can enjoy your video anywhere you want, on the device of your choice. You can make high quality copies of your DVDs and movies (even fitting up to 4 hours of video on a single-layer DVD), and convert DVDs and other videos (including TiVo® shows!) for your iPhone, iPod or other portable player. You can also save streaming Web videos from your favorite web sites and burn them to DVD for viewing on your big-screen TV! Popcorn 4 makes it easier than ever to enjoy your video anywhere.
But that's just the beginning, there's lots more. Popcorn 4's top five new tricks are:
- DVD Clip Extraction: Extract video clips or music from any DVD-Video and convert to the format of your choice
- Mac2TiVo: Stream video from your Mac to your TiVo DVR — perfect for home videos
- Scheduled Conversions: Save time by setting your video conversions to run when you're away from the computer
- YouTube™ Publishing: Send converted videos directly to YouTube
- Adobe Flash Conversion: Convert your videos to the Flash FLV format for easy online posting and sharing
Read on to learn more about each of these features.
Extract Clips from DVDs
Popcorn 4 lets you extract both video clips and music from unencrypted DVD-Video discs and VIDEO_TS folders. You just mark clips, or areas of the DVD-Video you want to extract, and then export them to the format of your choice. This feature is perfect for sharing short clips online, or using clips in presentations and demos. You can also extract the music only from concert DVDs to put on your iPod or other music player.
To extract video clips from your DVD begin a Convert>Video Files project. Then insert your unencrypted DVD-Video disc. From the Popcorn Media Browser, select DVD from the top menu and then drag your DVD into the project window. You can also drag in a VIDEO_TS from the Finder.
Now that your DVD is dragged into the project, you will see the Extract DVD Clip dialog. Select the video title you would like to extract a clip from in the pull-down Title menu. Also select the audio track(s) you'd like to use from the DVD, including any alternate languages.
To select the portion of the video title you want to extract, click the play button to preview the DVD title. Now you'll see a timeline below the clip. Drag the Clip Start Marker and Clip End Marker so that the area of video you would like to extract is between them. Alternatively you can change the value of Start Chapter or End Chapter to have the clip markers move to those positions.
Finally click the + button at the bottom left of the window. This will add your selected clip to the list of clips to extract. You can click on the name of the clip in the list to make changes to the name. If you want to extract more clips, simply select another video title and repeat the same steps.
When you're finished selecting clips, click the Add button. Your video clips will be added to the Convert>Video Files project. Now all you have to do is click the red Copy button. The Player Setup dialog will appear and you can export all of the clips to the format of your choice.
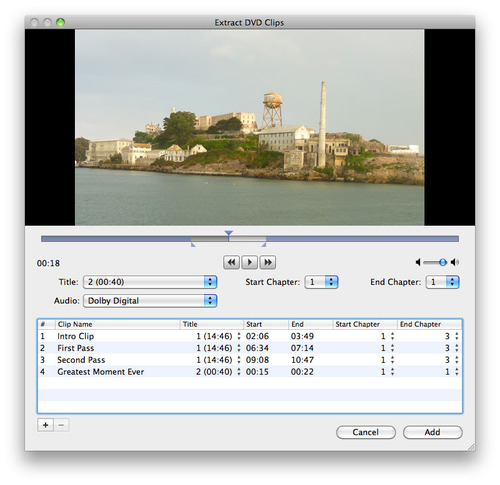
Extracting (click to enlarge).
If you'd like to extract audio only from a DVD-video disc, the procedure is similar. First, begin a Convert>Audio Files project. Then follow the same procedure for extracting video clips above. Now when you press the red Copy button, you'll be able to select the audio format you would like to use for extracted music.
Send Videos from Mac to TiVo
Popcorn has been able to transfer shows from your networked TiVo to your Mac for years now, using TiVo Transfer. But in Popcorn 4, we've added the capability to copy and stream videos back from your Mac to your TiVo! Now you can view those home movies you transferred from your digital camcorder on the big screen easily. Here's how:
First, open the Mac2TiVo application in the Popcorn folder. You'll be prompted to enter your TiVo Media Access Key in order to authorize file transfers. (The Media Access Key is available in the Messages & Settings>Account System Information area of TiVo Central.) You'll only need to do this once. Now simply drag video folders to the Mac2TiVo window (either standard or HD), and they will be converted to the necessary format automatically. Finally, click the "Start Server" button to send the videos to the Now Playing list on your TiVo.
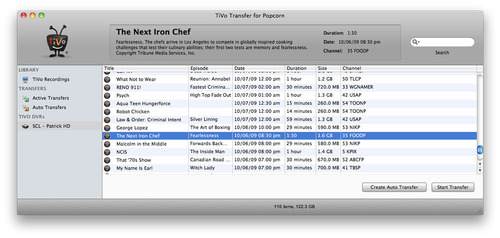
Streaming video from your Mac to your TiVo DVR with Mac2TiVo (click to enlarge).
Schedule Video Conversions
Even though Popcorn is as efficient as possible, converting video takes time, and can drastically slow down your machine in the process. With Popcorn 4, you can now queue up and schedule CPU-intensive video conversions to run when you're away from the computer, eliminating downtime. You can also pause and resume conversions at any time, so you are always in control of your computer. Even better, Popcorn 4's improved video preview quality ensures no unpleasant surprises after conversion — what you see is what you'll get. You can even save Preview clips at different settings to compare quality, and then choose the best one for the full conversion.
To schedule your conversion, begin your Convert>Video Files project and get to the point to where the Player Setup dialog appears. Next, select your Device, Quality, and Save To destination from the available options. Now click the Schedule button, select "At Exact Time," and specify when your video conversion should begin. You can also choose "Countdown" and select the number of hours and minutes before conversion.
Finally, click OK. Popcorn 4 will minimize to the dock, and a schedule icon will appear over the normal Popcorn icon to indicate that a video conversion has been scheduled. Note that Popcorn must remain running for the conversion to occur at the scheduled time; however you can switch to other user accounts using Fast User Switching.
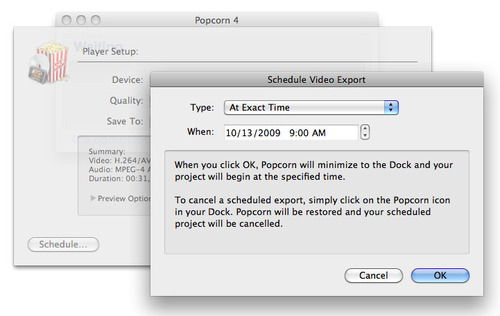
Scheduling video conversions means no more enforced coffee breaks (click to enlarge).
Publish Videos Direct to YouTube
Any video you convert with Popcorn 4 can also be sent directly to your YouTube account. You can select a title, category, description, and sharing options — then post to YouTube with a click. You can even publish your AVCHD home videos — saving significant time over iMovie since no lengthy conversion is required. Here's how.
First, start your Convert>Video Files project as you would any other, by adding video(s) to the project window using the Media Browser or dragging from the Finder. Then click the red Copy button and select YouTube from the Device pulldown.
Next, select your Quality level. You will notice the destination option is not available, this is normal because your destination is YouTube. Now click the Convert button and you'll be prompted with a YouTube dialog to enter information about your video.
If your YouTube account name is not shown in the Account pulldown, click Add and follow the instructions to enter your account details or create a new account. Then select the appropriate YouTube category for your video, and enter description and tag information.
You can also enable the "Make this movie private" option if you don't want other users to be able to see your video unless you explicitly share it with them. Finally, click Upload, and you video will be converted and uploaded to YouTube. Once complete, you can change your description and other details if desired by logging into your account on the YouTube site.
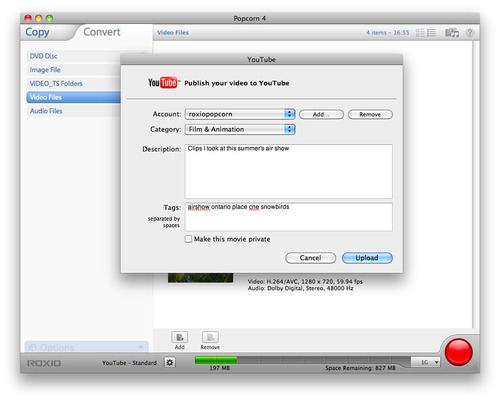
Publishing videos direct from Popcorn to YouTube (click to enlarge).
Convert Videos to Flash for Your Website
FLV and F4V, or Flash Video, are widely used formats for storing video that will be played back in Web browsers using Adobe Flash Player. Most video you watch on sites like YouTube is in this format. Popcorn 4 now allows you to turn your own video into FLV or F4V for Adobe Flash playback. Popcorn even generates the HTML template and video player controls you need for posting Flash video online. Here's how:
First, start a Convert>Video Files project as you normally would, by adding video from any source, including the Media Browser, to the Content Area. Then click the red Copy button, and select Flash Video (FLV) or Flash Video (F4V) from the Device pulldown. The format displayed here can be changed in Popcorn Preferences; F4V is Adobe's current recommendation. Next, select a quality level and destination for your converted video. Finally, click the Convert button and your video will be exported into the selected Flash video format.
There is also a "Flash Video with Player" option available from the Device pulldown menu. Selecting this option will not only convert your video into FLV or F4V video for Adobe Flash, but will also create an HTML template and video playback controller to make it easy to insert your Flash video into any Web page.
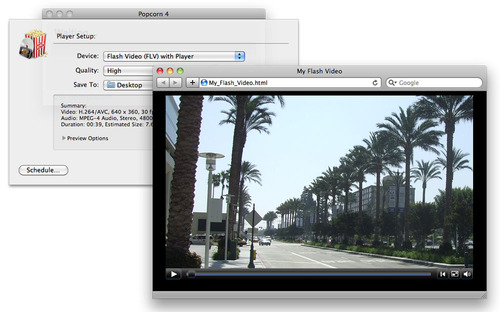
Exporting video in Flash format for sharing on the Web.