Life is busy, especially around the holidays. If you're tired of missing your favorite shows or simply want to save them for watching later on DVD or your iPod, try Toast 9 and EyeTV. With EyeTV, you can turn your faithful Mac into a high-definition digital video recorder, saving shows automatically that you can view anywhere: on your computer, on your TV, or on a portable player. Even if you have a DVR, you probably can’t export the contents to your Mac, much less your iPhone. And it all works with both regular and HDTV! You can even use Toast to burn DVDs or Blu-ray Discs with your recordings. (Blu-ray requires the optional Toast HD/BD Plug-in.)
Assuming you already have Toast 9 or Popcorn 3, all you need to do is add one of the Elgato EyeTV tuners, such as the EyeTV 250 Plus and EyeTV Hybrid USB stick to turn your Mac into a HD DVR. Whichever way you go, Toast and Popcorn make it easy to save the programs you've captured on your Mac to DVD, or export them to your iPhone, iPod, Apple TV or other media player.
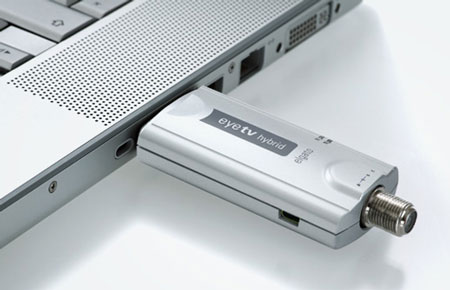
Elgato EyeTV Hybrid USB stick.
The EyeTV tuners do a lot more than just record video to hard disk, however. The software interacts with the free TitanTV online program guide to schedule recordings, and maintains a list of past recordings stored on your hard disk, so you can use it like you would a regular HD DVR, but without the monthly fees. It even lets you pause live TV, skip commercials, and enjoy instant replays. Since most newer Macs, and many older ones, have video output capabilities, you can plug the output from your Mac into a TV set (including HDTVs), and use your Mac's remote control (or your iPhone with the Remote app) to watch or record video from the comfort of your couch in full high-definition!
Both tuners can record over-the-air broadcasts in standard or high-definition, as well as cable or satellite signals using the set-top converter box supplied by your provider to change channels, and then plugging the output from the converter into the EyeTV, which should be tuned to channel 3 or 4, depending on your service. (Unscrambled Clear QAM cable channels don't require a converter box.) They can also accept almost any form of standard-definition analog video, with S-Video and RCA jacks for plugging in sources like VCRs, camcorders and DVD players. The EyeTV 250 Plus also includes on-board hardware encoding to take the burden off your Mac's processor for standard definition recording. It's great for converting old tapes to digital format. (Note that for HD recording, a Dual G5 or Intel Mac is required.)
Using EyeTV
Open the EyeTV software and three windows appear: a resizable video window, a program list of all available recordings on your hard disk, and an onscreen controller (which you can use along with or in place of an infrared remote). The onscreen controller (pictured below) tells you what the current show is and how far into it you are, and provides typical fast forward/reverse/pause/record/volume/channel functions, as well as instant replay, mute, program guide, and 30-second commercial skip buttons.
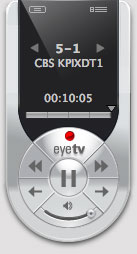
The EyeTV controller.
Here's the video window, with the controller and recording information displayed. The video window can be resized as desired, or fill the screen. You can also show or hide the controller at any time.
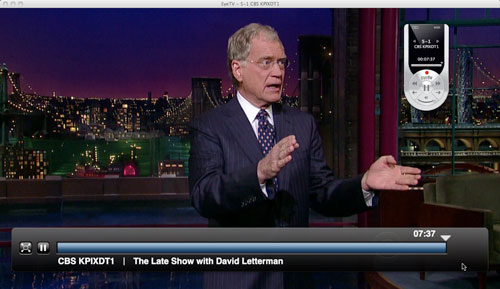
EyeTV playing video live, with controller and recording information bar.
Step-by-Step from Video Recording to DVD
Now that you've become familiar with the features and capabilities of EyeTV, here's a step-by-step guide to burning your recorded EyeTV programs to DVD or converting them for your iPod, iPhone or other media player.
1) First, connect things up according to the EyeTV instructions, then run the EyeTV software setup program to sign up for the online program guide (so you know what you're watching, and can program future recordings). The setup process will also tune all the channels coming off your antenna or cable/satellite input. The program guide supports over-the-air, cable and satellite services.
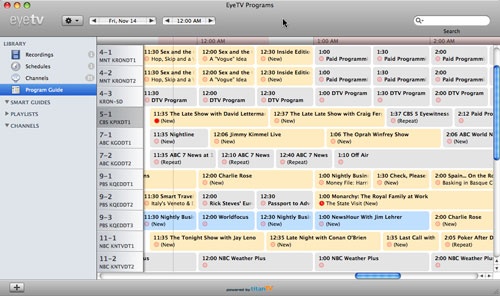
The EyeTV program guide. Scheduled recordings are indicated by a red dot.
2) Next, choose a future show to record by clicking the red Record button that appears next to it. You can even set a show to record all season long, so you'll never miss another episode of American Idol or 24. Better yet, if you set the preference to "Start EyeTV when a device is plugged in," it will wake up your Mac from sleep to record, and even boot up your machine if it is off (with OS 10.2 or later and automatic login enabled in your Mac System Preferences)! No worries about having to leave your machine on all the time.
3) When you're done recording, the show will appear in the Recordings window, where you can select it for playback on your computer, or burn it to disc. To make a DVD or Blu-ray Disc (with a Blu-ray recorder and the Toast HD/BD Plug-in) select your recording(s) within the Toast 9 Media Browser and drag them to the Video Project window. About 2 hours of standard-definition video will fit on a DVD, or about 2 hours of high-definition video on a 25GB Blu-ray disc. Choose menu and navigation options for your disc at lower left, then press the Burn button. You can also trim out commercials from your recordings before burning, by clicking the Edit button next to each video in the Project window.
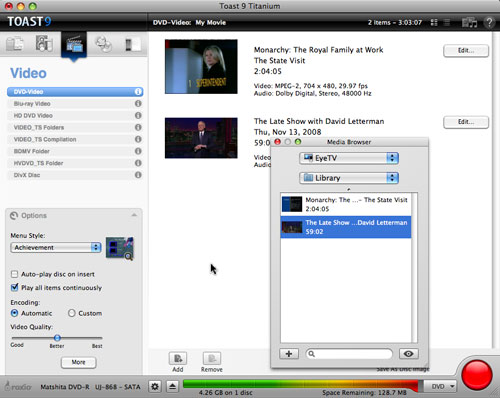
Making a DVD or Blu-ray Disc from your EyeTV recordings.
4) To convert EyeTV recordings for your mobile device or set-top player, such as your iPhone, iPod Touch or Apple TV, click the Convert Tab in the Toast window and drag in your recordings from the Media Browser as above. Again, you can trim out commercials or other unwanted portions using the Edit button next to each video.
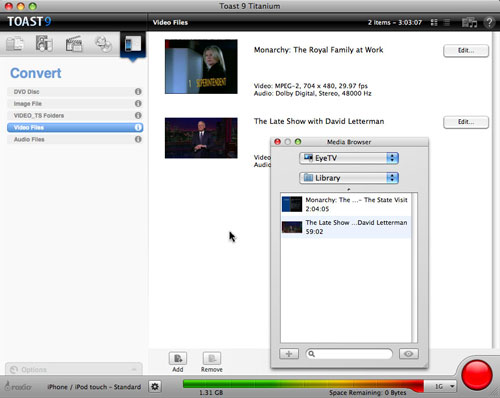
Converting EyeTV recordings for your mobile device or set-top box.
Finally, select the format you want to convert to from the drop-down list (click the Recorder Settings icon at lower left). We chose to export for our iPhone. Then click the Burn button and your converted videos will be sent straight to iTunes!
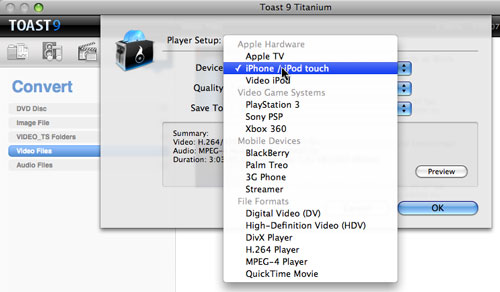
Choosing a player format for your conversions.