Need a soundtrack for a family vacation or road trip? Unlock your family's musical past by converting old LPs and tapes to MP3, then create mix discs or playlists customized for every mood. All you need is Easy LP to MP3 and a turntable. You can dig up your old one, or borrow one from a friend. The process is quick and painless.
Easy LP to MP3 makes it easy to get great results with its LP & Tape Assistant. Even better, once you've made your recordings, you can put away those LPs and tapes, preventing further wear and tear. You can also go on to make CD and DVD compilations — perfect for family reunions, holidays, anniversaries and birthdays — even combine them with tracks from digital sources like CDs or Internet radio.
For records that were never issued as CDs, or family audiotapes, transferring these analog sources to digital will help you enjoy them and preserve them for future generations. And Easy LP to MP3 makes it simple. Here's how:
Step 1: Use a Clean Source
When digitizing analog audio make sure you get the best signal into the computer before recording. While Easy LP to MP3 has a noise cleanup tool, this should be viewed as a secondary cleaning. Wipe your LPs first with a lint-free anti-static cloth or record brush. If you have a lot of material to record, you might also consider replacing the needle in your turntable if you can't remember the last time you did so. Similarly, if you are digitizing tapes, make sure your tape deck heads are clean, and that you engage the same noise-reduction technology (Dolby B or C, etc) used when the tape was recorded, for proper decoding.
Step 2: Connect Things Up
The Easy LP to MP3 package includes a USB recording device and all the cables you need to connect most analog audio sources. First use the provided USB cable to connect the device to your computer. Now plug one end of the provided dual-headed RCA cable into the audio input jacks on the USB capture device. Be sure to connect the red plug into the red jack and the white plug into the white jack, to maintain the correct stereo signal. Red is right, and white is left.
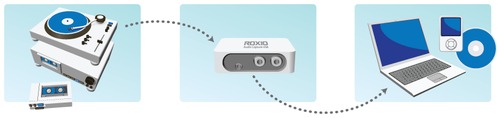
Connecting your analog audio source to your USB capture device and computer.
Finally, connect the other end of the RCA cable into your analog audio source, such as a receiver, preamp or tape deck with "line-level" stereo output jacks (often labeled "tape out"). Note that turntables generally deliver "phono" level audio output and must be run through a preamp or receiver. They cannot be connected directly to the USB capture device. If your source does not have RCA jacks, such as a portable tape player, you can use the headphone jack, along with the provided mini-jack to RCA adapter cable. If you do use a headphone jack as your source, you'll have to do a little extra work in adjusting input levels, which we'll cover in Step 3.
Step 3: Choose Recording Input and Adjust Levels
Now you're ready to start recording! Open Easy LP to MP3 and choose the Audio>Convert LPs and Tapes task. This will open the LP & Tape Assistant, and you'll see a Recording window with options for selecting your audio input and adjusting the recording level. Choose "Line (USB Multimedia Audio Device)" to select the capture device. If you're using Windows XP, also select "Line" from the Input dropdown menu. Then click the "Recording Setup Guide" button for detailed instructions on setting recording levels.
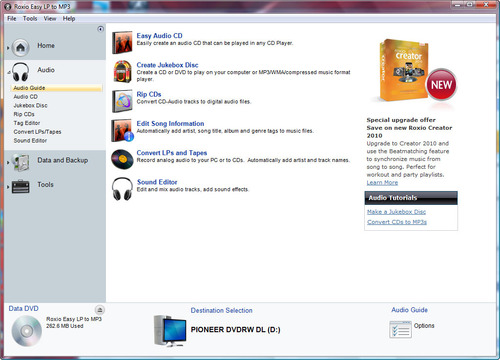
Starting the LP & Tape Assistant from the Roxio Easy LP to MP3 main window (click to enlarge).
Setting the correct recording level is very important. You want to get as high a level as possible without "clipping," which can cause distortion. If the recording meters go into the red zone, sound is being clipped and you should readjust your recording level. Note that if you have used the headphone connection of a tape recorder or amplifier as your source, you may also want to adjust the volume on your tape deck or amp. To minimize distortion from headphone jacks, it's best to use a midpoint volume level on the source, then adjust the level further using the level slider in Easy LP to MP3. You can also use the "Auto" button to have the program automatically analyze your source and set the correct recording level.
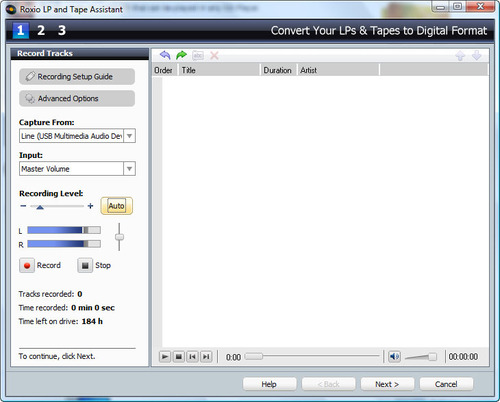
Setting the recording input and level. Note that the level does not go into the red (clipping) zone (click to enlarge).
Now, start playing a song and listen to it come through your computer. Use quality headphones or external speakers if possible. Check for hum — you may need to ground your source deck (all turntables come with a special ground wire for this purpose). Also keep sound cables away from CRTs, televisions and other sources of electronic noise.
Once you've got a clean sound source coming through, it's time to begin recording! Cue your source to the beginning, press the red Record button, then start your source playing. Don't worry about recording blank space at the beginning; you can remove that later. Make sure you have enough disk space before starting. The Assistant tells you how much recording time you have available.
By default, the LP & Tape Assistant automatically separates tracks whenever a period of silence is encountered. To adjust the sensitivity of the track separator, click the Advanced Options button. Here, you can also limit recording time to a given number of minutes (handy for unattended recording), mute system sounds, and specify the file format and quality of the recording (CD quality is the default).
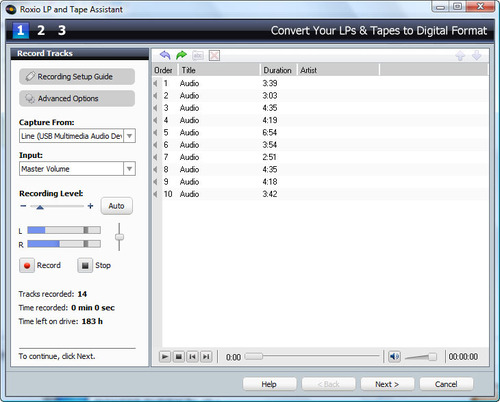
The finished recording of a single album side, automatically split into tracks (click to enlarge).
Step 4: Identifying and Enhancing Your Tracks
Now click the Next button at bottom right to go to Step 2 of the Assistant. Here you'll get a chance to identify and enhance your recordings. You can correct track splits, edit out unwanted bits at the beginnings or ends of tracks, and use filters to clean up and improve sound quality. You can also automatically identify the artist, album and song names!
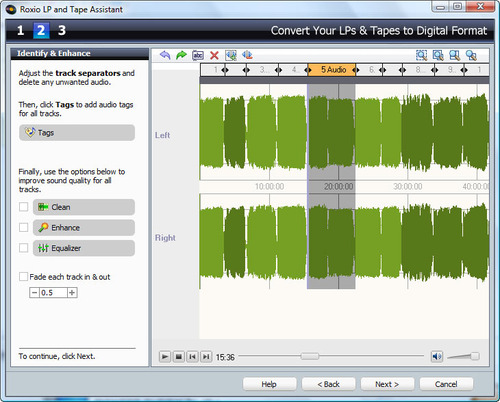
Trimming the recorded tracks (click to enlarge).
After you've adjusted the track separators to trim your tracks (use the zoom buttons at top right to get a close-up look, then drag the separator arrows left or right), click the Tags button. The Edit Audio Tags window will then open, where you can identify your tracks automatically with MusicID.
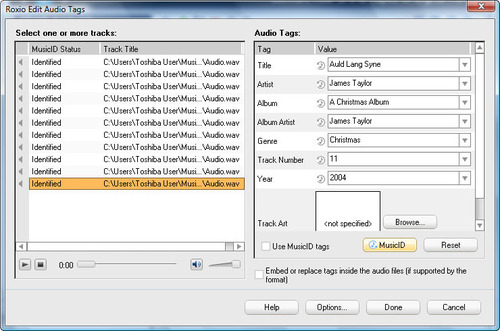
Identifying your tracks and editing audio tags (click to enlarge).
Finally, checking the Clean box will reduce noise on all your tracks, while Enhance will improve the dynamic range, especially important for tape sources. Click the Clean and Enhance buttons to choose filtering options. You can also fade each track in and out by a variable length of time, and preview the results using the playback controls at lower right.

Cleaning your recordings (click to enlarge).
Step 5: Burn or Export Your Recordings
Once you're satisfied with your new recordings, it's time to burn them to disc or send them to your music player! To record a CD, select the tracks you'd like to include by ticking the checkboxes, then click the Burn Audio CD button. If desired, also click the checkboxes to add CD-Text info to your Audio CD, and to maximize track volumes (which will equalize the volume levels of tracks from different LPs).
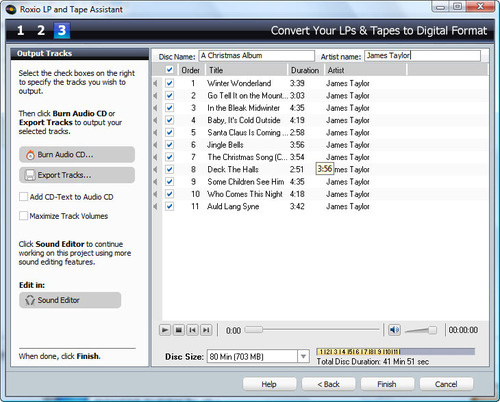
Export options for your recording (click to enlarge).
If you'd like to output your recordings to files, such as MP3, WMA, FLAC or OGG files for use in your iPod or other portable audio player, select your tracks, then click the Export Tracks button. You'll be prompted to choose your output format and destination. Finally, you can also choose to send the tracks to the Sound Editor for further tweaking before burning or conversion.
So dust off those albums and start recording! Don't forget to transfer that beautiful cover art to your new CDs as well, with the included Express Labeler software. Find it in the Tools area of the Easy LP to MP3 home screen.