With tornados, hurricanes, floods, fires and earthquakes seeming to occur with alarming regularity, not to mention bridge collapses and steam pipe explosions, it's clear that no part of the country is exempt from possible disaster. Most of us perform some type of hard disk backup, but are you prepared if your entire home office should be destroyed in a fire or flood? If your backup discs go up along with your computer, they aren't of much use. Imagine the total catastrophe of losing not only your precious family photo albums, but all your digital versions as well.
And even if you have an offsite backup, do you have easy access to it? Would you be able to get your business or Web server back up and running on short order?
If the answer to any of these questions is no, you need a disaster plan. It doesn't need to be overwhelming. For example, a basic plan might be to simply burn a DVD of your entire digital photo library and mail it to a few relatives. You'll spread the risk over several disparate locations, and let others enjoy your photos too. Do the same for any large archives of material you don't want to lose, such as your email folder, iTunes library, Documents folder, and so on. If some material is private, use Toast's encryption option to burn a password-protected disc, and put it in a sealed envelope to be opened in the event of need. Repeat this process once a year or so, perhaps at holidays where your relatives are all in one place.
Now that you have some basic protection against losing the bulk of your files, it's time to turn to the regular daily and weekly backups. You are making these, right? Okay, well, if you haven't yet gotten the habit, here's how:
Toast 8 offers three main ways to keep your data safe. First, it includes Déjà Vu, a powerful, yet easy-to-use program that helps you schedule automatic backups to a second hard drive, a network server, or to a blank CD or DVD. Second, you can use Toast's Volume Disc and Disc Spanning features to make an exact copy of a hard disk volume onto a set of CDs or DVDs. Finally, for everyday quick-and-dirty backups or file transfers, you can of course just drag and drop selected files or folders into the Toast window and press the Record button.
A good backup plan might include all three of these methods. For example, you might keep a CD-RW or DVD-RW handy for quick manual backups of key files on a daily basis, use Déjà Vu to schedule weekly backups of all your documents, and use Volume Disc copying to back up your entire hard disk, including the System and Applications, once a month. For the weekly and monthly backups, use two rotating sets of discs, and keep the most recent set in a different location, such as your office.
Backing Up with Déjà Vu
Déjà Vu lets you back up any number of folders manually at the click of a button, or automatically on a daily, weekly or monthly basis. Backups will take place even if you aren't logged in. If you forgot to check the option to install Déjà Vu along with Toast, you can add it later by rerunning the Setup Assistant from the Toast Help menu.
The three-step backup process could not be easier. Just select When (time), What (files & folders) and Where (destination drive), and you're done. Other powerful features of Déjà Vu include remote backup to networked servers, intelligent backup of changed files only, and folder synchronization. Read on for a complete tutorial on using Déjà Vu.
1) First, select the Déjà Vu pane from the System Preferences window. Then click the lock icon at the bottom left and enter your administrator password. This unlocks the features of the program. Also choose "Enable" from the drop-down menu at top left if not already selected.
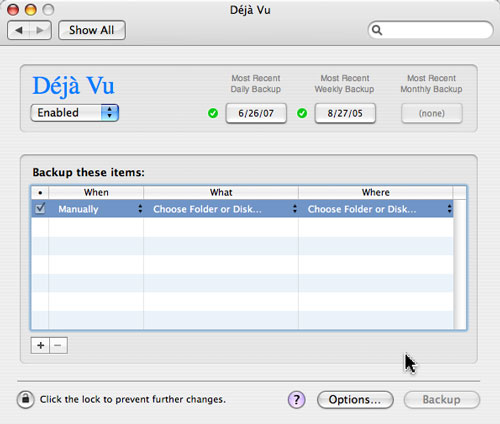
Make sure Déjà Vu is enabled and unlocked before starting to create backup schedules.
2) Next, select folders or files you want to back up by double-clicking "Choose folder or disk" under the What heading. Keep adding folders to back up by clicking on the plus sign at lower right. If you want to make a "clone" or exact copy of your entire hard disk, select your system drive icon instead of a folder.
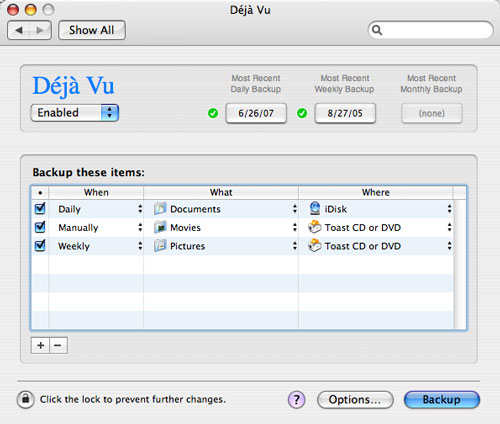
Backing up in Déjà Vu is a simple matter of choosing What, When and Where.
3) Then decide how often you want to back up each file or folder in your list by choosing Daily, Weekly or Monthly under the When heading. You can also specify exact times for your backups by clicking the Options button at lower right, then choosing the Schedules tab.
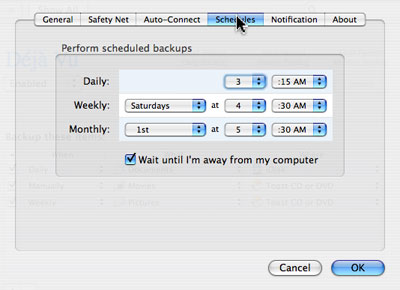
Change the default time for your daily, weekly or monthly backups in the Schedules Options pane.
4) Finally, choose the destination for your backup, the folder where files should be saved, under the Where heading. This can be any drive available at backup time, from external hard drives to networked servers to CD and DVD recorders. You can even back up to the unused hard disk space on your iPod if it's plugged in. Déjà Vu will check to see that the drive is available, and that there's enough space to complete the backup. If you are making a clone of your entire hard drive, be sure to reformat (erase) the destination drive (as Mac OS Extended) just before cloning. Also check off "Repair Disk Permissions" and uncheck "Remote Backup" in the General Options pane. If your destination drive is a remote server, enter a username and password (if needed) for the server in the Auto-Connect Options pane.
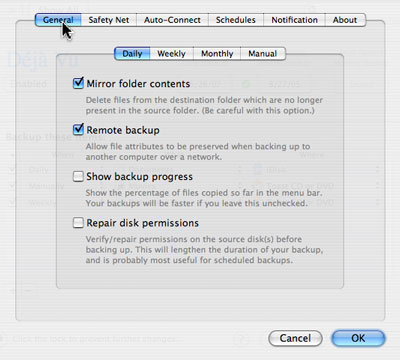
Déjà Vu's General Options pane has several useful settings.
5) Now your backups are ready to go. Automatic backups will occur at the scheduled time, provided the destination drive is available. Or if you want to backup manually, click the Backup button at lower right to start the process. All items that say "Manually" and are checked off in the left-hand column will be backed up immediately to the selected destination. If you are backing up for the first time, do a manual backup and check to be sure everything went okay. Then future backups can be performed according to a schedule.
Note that you don't have to be logged in for scheduled backups to take place, but they will not occur if your machine is sleeping. You may want to change your Energy Saver preference to prevent this from happening. Be sure to click the Schedule button again each time you change any options or add any new files/folders to the back-up list.
6) If you're backing up to CD or DVD, you can also take advantage of Toast 8's data compression and encryption features, which let you fit up to fifty percent more on your data discs. And with 128-bit encryption and password protection, you can be sure that your data is secure from prying eyes. To use either feature, simply select the Compressed or Encrypted option from the disc settings drawer before burning. Note that these options are available for "Mac only" data discs-not Mac/PC hybrids.
Decompressing or decrypting is even easier. These two functions are built right into OS X and no special software is needed, not even Toast. All you need is the password you selected when burning your encrypted disc.
Using Mac Volume Recording
One of Toast's unique and useful features is the ability to burn entire Mac volumes to CD or DVD. This is great for making personal backups of smallish hard disks onto sets of DVDs (or up to 50GB per Blu-ray Disc). Here's how to record a disc in Mac Volume format (Mac OS standard HFS) with Toast 8 Titanium:
1) First, choose the Mac Volume project under the Data button (if you don't see it, check the box to "Show Legacy Settings" in the Toast Preferences). Note that you can't use Volume format to create bootable discs, and that File Sharing must be turned off on volumes you want to copy.
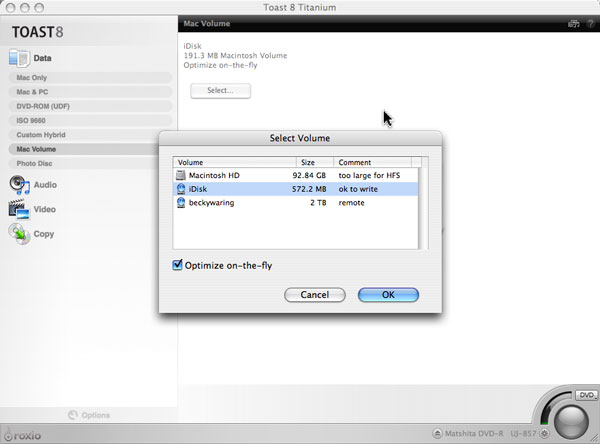
Toast's Mac Volume recording option tells you which disks can be burned as CD or DVDs.
2) Then drag the volume you want to copy into the Toast window from the desktop, or click the Select button to choose it. You can only select volumes with the comment "ok to write."
3) Click the Record button, insert a blank disc, and you're done!
Now that you know just how easy it is to be backup with Toast, we're sure you will be the most prepared person on your block.